

Quick guide: match the organizer to your cable route
Multiple fixed cords under a desk? Start with a tray sized for the strip and power bricks. Cables moving with an adjustable desk? Plan a service loop and a flexible sleeve. Only a few loose leads? Removable ties and appropriately sized clips may be enough.
Measure the desk's mounting clearance, trace the route to the outlet, and keep plugs reachable. Check the organizer and electrical equipment instructions before installing; neatness should never hide a damaged cord or compromise access.
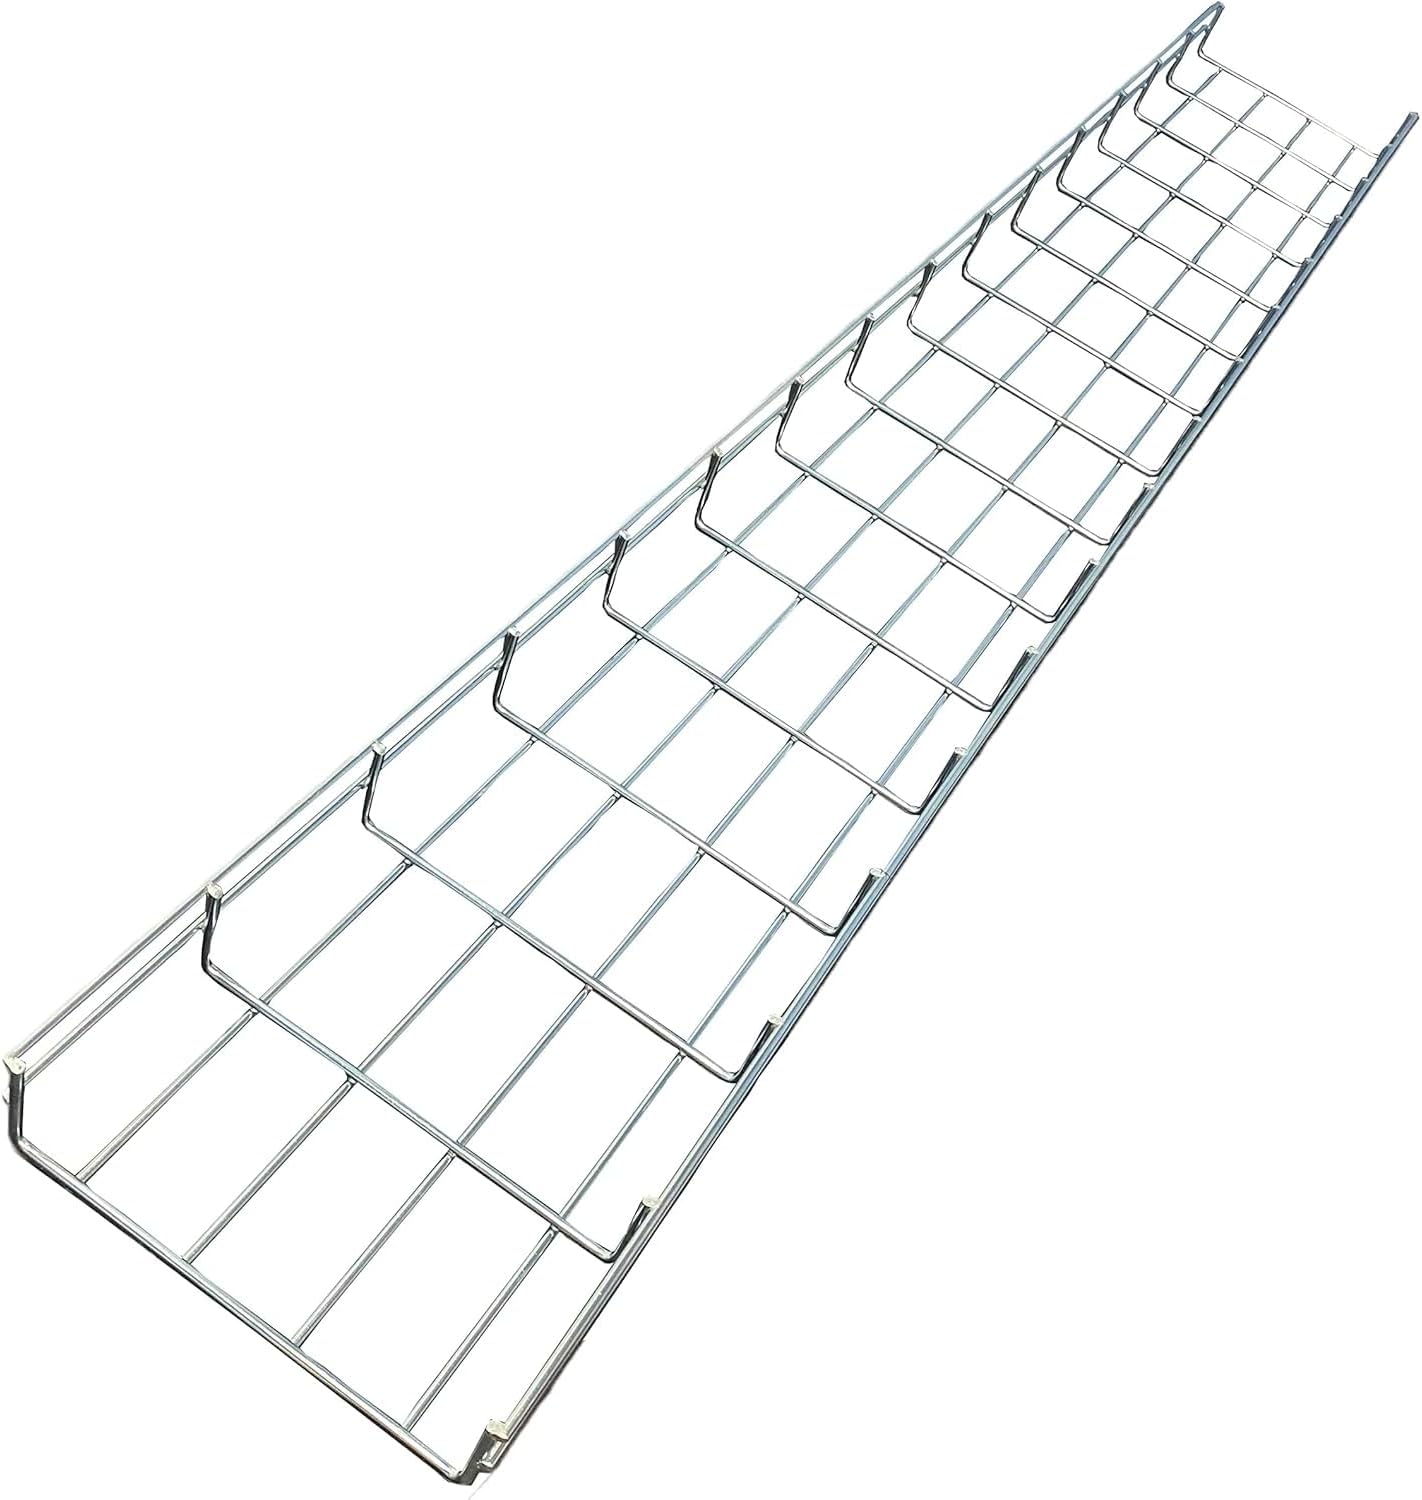
- Five-foot cable tray provides extensive wire management capacity.
- Eight-inch width accommodates multiple power and network cables.
- Zinc-plated steel construction creates a strong cable support system.
- Open wire mesh design keeps routed cables easily accessible.
- - Ten-piece bulk pack suits larger offices and network installations.

This is cable management for setups that have genuinely outgrown small trays
The Kable Kontrol cable tray takes our number one position for Best Cable Organizer because it is considerably more substantial than the small plastic channels and short under-desk baskets normally associated with cable management. Each wire mesh section measures 5 feet long, 8 inches wide, and 2 inches high, and this listing provides a 10-piece bulk pack.
That means the product is aimed at larger installations. The five-foot tray provides serious cable capacity for desks, offices, network areas, equipment rooms, or long cable runs where several cords need to travel in the same direction.
The 8-inch width is particularly useful. A narrow cable tray may look fine when it contains one power cable and a monitor lead, then become overcrowded as soon as a power strip, Ethernet cables, USB cables, display cables, and laptop chargers are added.
This tray gives those cables more physical room. You can separate groups rather than stacking everything into one dense bundle.
That matters for maintenance. Organized cables are easier to trace and replace, especially when a device stops working and you need to identify one cable among twenty similar black cords.
The zinc-plated steel construction is another reason this product ranks highly. This is not a flexible plastic sleeve designed only to hide a few lightweight charging cables.
The metal wire basket creates a structural pathway for cable runs. Once properly mounted, cables can sit inside the tray rather than hanging loosely underneath a desk or across an equipment area.
The listing also identifies the tray as suitable for network and fiber optic cable management. The open mesh format works well for structured cabling because cables can enter and leave the basket at different points instead of being forced through one enclosed opening.
That flexibility becomes valuable in a real installation. One Ethernet cable may need to leave the tray for a nearby workstation while the rest continue another several feet toward a network cabinet.
The open wire design makes changes much easier later
Cable management often looks simple on installation day. The difficult part comes six months later when another monitor, computer, access point, printer, network switch, or charging system needs to be added.
An enclosed cable raceway can require covers to be removed before a new cable can be routed. With an open wire basket, existing cables remain much easier to access.
You can inspect the cable path visually. If one cable needs replacement, it can be traced through the tray rather than disappearing into a completely enclosed channel.
This is useful underneath large office desks. A workstation may begin with one computer and monitor, then gradually gain a second display, docking station, speakers, phone charger, Ethernet connection, webcam, and other peripherals.
The cable organizer needs to accommodate that growth. Buying a tray that is already full on the first day usually means the cable management system will become messy again later.
Extra tray capacity leaves room for expansion, and the 8-inch width gives this Kable Kontrol system a useful advantage in that respect.
The open mesh construction also makes cable ties easier to use. Reusable hook-and-loop straps can pass around the tray wires and hold groups of cables in specific positions.
Do not tighten those straps excessively. Data cables should be supported rather than crushed into extremely tight bundles.
This is particularly important with fiber optic cable. Fiber needs to maintain an appropriate bend radius and should not be sharply folded around the edge of a tray.
Avoid tight bends in network cabling, even when the tray physically allows you to force the cable into a smaller turn. Good cable management should protect the cable, not simply make the installation look tidy.
Ethernet cables deserve similar care. Avoid crushing them beneath heavy power adapters or pulling them tightly around corners.
If the installation includes power and data cabling, plan the layout before filling the basket. Local electrical requirements and the types of cables being routed can affect how different services should be separated.
Do not treat a cable tray as permission to mix every cable in a building together. Follow applicable electrical and network installation requirements, especially in commercial spaces.
The product listing describes the tray as NEC approved, which is relevant for buyers considering more formal cable installations. Still, the complete installation needs to comply with whatever electrical and building requirements apply to the actual location.
The tray itself is only one component. Mounting method, cable type, loading, routing, grounding requirements where applicable, and surrounding infrastructure all matter.
For a simple home-office installation, the process is much less complicated. The main goal is usually getting cords off the floor and away from feet, chair wheels, vacuum cleaners, and moving desk components.
Keeping cables off the floor prevents everyday problems, especially when an office chair repeatedly rolls across the same power or network cable.
A cable lying underneath a chair can eventually become damaged. Even before that happens, it makes cleaning awkward and gives the workstation an unfinished appearance.
An under-desk wire tray creates a dedicated path instead. Cables leave the devices, enter the tray, and remain supported until they reach the power or network connection.
For a standing desk, cable planning becomes more important. The desk needs enough free cable length to travel from its lowest to highest position without pulling connectors.
Always test the full desk movement first before permanently securing every cable. Raise and lower the desk while watching the power, monitor, Ethernet, USB, and peripheral cables.
If a cable becomes tight before the desk reaches maximum height, add slack or change the routing. Do not rely on the connector to absorb the tension.
A cable tray can hold the excess length neatly underneath the desktop. This keeps the necessary slack available without letting several loops hang toward the floor.
Why we believe this cable tray deserves the number one ranking
The biggest reason is capacity. A five-foot-long, 8-inch-wide steel basket handles a different class of cable management than small adhesive clips or short desktop channels.
The size works for demanding installations, including long desks, shared workstations, office furniture, network infrastructure, and areas where multiple cable types need a defined route.
The 10-piece bulk pack extends that advantage. Instead of solving cable management at one small desk, you can create consistent routing across several workstations or a larger installation.
For an office administrator, that consistency matters. Ten desks can use the same cable-management method rather than each workstation ending up with a different collection of clips, sleeves, and improvised ties.
Network installations can benefit similarly. A series of trays can create an organized path between equipment areas while allowing cables to branch off where required.
A consistent cable path simplifies future maintenance, because technicians can immediately understand where network and equipment cables are supposed to run.
The zinc-plated steel construction also suits that larger scale. Steel provides a rigid support structure for the cable load rather than relying on adhesive strips attached to furniture.
Mounting quality is important, though. A strong tray attached poorly is still a bad installation.
Before mounting underneath a desk, check the desktop thickness. Screws that are too long can penetrate the upper surface.
Measure the mounting surface before drilling. This takes less than a minute and can prevent permanent damage to an expensive desk.
Also check what is inside the mounting area. Some desks use hollow construction, metal reinforcement, cable channels, or moving mechanisms underneath.
A standing desk may have motors, crossbars, and moving frame components. Make sure the tray cannot interfere with them throughout the full height range.
Plan the basket position before installing it. Leave enough clearance for knees, drawers, monitor-arm clamps, and any other equipment mounted under the desk.
Good cable management should stay out of the way, not replace visible cable clutter with a metal basket that hits your legs.
The 2-inch tray height is useful because cables remain relatively contained while still being accessible from the open top and sides. It creates a defined channel without turning the tray into a bulky enclosed box.
Power adapters can be more complicated. Large charging bricks may fit depending on their dimensions, but do not assume every oversized power supply belongs inside the tray.
Check the available space and support. Heavy adapters should not rest awkwardly on cables or create concentrated load in one small section.
Distribute heavier components sensibly and keep ventilation requirements in mind for power supplies that generate heat.
A power strip can sometimes be incorporated into an under-desk management setup too. Whether it belongs inside, beside, or separately mounted from the tray depends on the dimensions and installation requirements.
The advantage is that device power cords can terminate underneath the desk rather than all traveling down to a floor-level power strip. This can dramatically reduce visible cable length.
For a workstation with two monitors, a desktop computer, dock, speakers, lamp, and chargers, this makes a noticeable difference. Most of the cable bulk remains underneath the desk.
Only a controlled power connection needs to descend, depending on how the system is configured and what electrical requirements apply.
Network cables can follow the tray separately. Label them at both ends if several similar Ethernet runs share the same basket.
Do this during installation, not later. Once ten blue Ethernet cables look identical inside a five-foot tray, figuring out which one reaches which device becomes unnecessarily tedious.
Use labels that describe the destination clearly. Something like "Desk 4 PC" is more useful than a random number nobody remembers.
Labeling turns organization into maintainability. A neat cable tray is only partly useful if nobody can identify what the cables actually do.
Reusable hook-and-loop ties are generally convenient for data cables because they can be opened when the setup changes. Plastic zip ties work too, but they are easier to overtighten and need to be cut during changes.
If zip ties are used, leave enough space that the bundle is supported rather than compressed. Be careful when cutting them later so the tool does not damage the cable insulation.
Another useful technique is grouping cables by destination. Cables heading toward the left side of a workstation can occupy one section while those going toward the right stay grouped separately.
Logical grouping speeds up troubleshooting, especially when the tray contains cables for several computers or network devices.
Do not create extremely large bundles merely because the basket can hold them. A smaller number of organized groups is easier to maintain.
For network installations, leave service loops only where they are useful. Excessive cable length stuffed randomly into the tray can make future tracing harder.
At the same time, do not cut every cable so precisely that equipment cannot be moved for maintenance. Some controlled slack is useful.
Good cable management balances slack and order. Too little slack stresses connectors, while too much creates unnecessary clutter.
Fiber optic cable deserves particular attention because bend radius matters. Large smooth curves are preferable to sharp corners.
The wire mesh construction can help because cables are not confined to a narrow enclosed raceway. They can follow a broader curve as they enter or leave the basket.
Still, the installer is responsible for routing correctly. The tray does not automatically protect a cable from poor handling.
Support cables without forcing their path, particularly delicate data and fiber runs.
For home offices, one practical benefit is easier cleaning. Once cables are lifted off the floor, a vacuum or robot vacuum can move underneath the desk without catching loose cords.
This sounds minor until a robot vacuum drags a charging cable across the room or disconnects a power adapter. Keeping cords elevated eliminates that problem almost entirely.
Office chairs are another issue. Casters repeatedly rolling over cables can damage outer insulation and internal conductors over time.
A raised cable route protects floor-level cords, especially around frequently used desks.
The tray can also improve the appearance of sit-stand desks. Loose cables become much more noticeable when the desktop rises and exposes everything underneath.
Keeping most cables inside a basket makes the underside look more deliberate. Only the necessary moving cable bundle needs to travel between the desk and fixed connections.
Use a flexible cable sleeve or controlled bundle for that moving section if appropriate. Test the desk at maximum and minimum height afterward.
Moving desks require dynamic cable planning, not simply the same cable routing used on a fixed table.
Monitor arms deserve consideration too. Their cables normally need enough slack for height, tilt, and rotation adjustments.
Route those cables into the tray only after confirming the monitor can move through its normal range. A perfectly neat cable can become too short when the arm extends forward.
USB-C laptop docks create another interesting cable-management challenge. One dock can have power, Ethernet, monitors, USB devices, audio, and the laptop connection all meeting in a small area.
A wide tray helps around docking stations, because those connections can be routed into one organized pathway instead of spreading across the floor and desktop.
Place the dock itself where it remains accessible. You may need to connect temporary USB devices or remove the laptop cable regularly.
Not every device should disappear inside the cable tray. Equipment requiring frequent access belongs somewhere convenient.
The open basket makes this easier because cables can enter or exit almost anywhere along the run. You are not restricted to a few predefined openings.
Open access makes future changes less frustrating, which is a major advantage over tightly enclosed raceways.
If a monitor is replaced, remove its cable without dismantling the whole cable-management system. Route the new one through the same general pathway.
If another Ethernet run is added, place it alongside the existing network group. The system can evolve without being rebuilt from scratch.
This matters in offices because workstations change frequently. Computers move, monitors are upgraded, employees change desks, and network equipment gets replaced.
A reusable cable system handles those changes better than one based entirely on permanent adhesive channels.
Adhesive cable organizers have their place, particularly for lightweight cables and locations where drilling is impossible. But adhesives can weaken with heat, dust, surface coatings, and time.
A properly mounted steel tray provides a more structural solution. That is one reason we rank this Kable Kontrol system above smaller organizers for demanding setups.
The tradeoff is installation effort. This is not a tiny clip that you stick underneath a desk in thirty seconds.
Installation requires some planning and mounting work, but the result is designed to handle a much larger cable load and longer routing distance.
The five-foot length also means you need enough installation space. Measure the underside of the desk or intended route before ordering around it.
A five-foot tray obviously does not make sense underneath a tiny writing desk. The product is strongest when the physical installation actually benefits from that length.
For shorter desks, a smaller organizer may be easier. For long shared desks or network areas, the extra length becomes one of this product's biggest advantages.
Choose tray size around the actual cable route, not simply the maximum capacity available.
The 10-piece quantity deserves the same consideration. A single home workstation may not need ten five-foot trays.
For an office, installation project, network room, or multiple desks, however, the bulk pack can be much more logical. It provides up to 50 feet of tray sections across the complete pack.
That scale is one reason this product stands out in our Best Cable Organizer comparison. It can address an entire workspace rather than one small cable cluster.
The bulk format suits larger organization projects, where consistency across several cable runs matters.
For a network closet, route cables so connectors are not carrying the weight of long hanging runs. The tray should support the cables along the route.
A cable connector is designed to make an electrical or optical connection, not to function as a structural support point. Give the cable adequate support before it reaches equipment.
The same applies under a desk. Do not let the full weight of a heavy cable bundle pull on the back of a computer or monitor.
Support the cable before the connector, leaving a relaxed final section into the device.
For power cables, avoid tightly coiling unnecessary lengths around adapters. Organize the slack without creating a dense heat-trapping bundle.
Power supplies that become warm should retain appropriate ventilation. Do not bury them beneath a pile of cables simply because the basket has enough room.
The open mesh design helps air move around the installation, but sensible placement still matters. Keep heat-generating equipment from being smothered by cable bundles.
Organization should not compromise ventilation, particularly around chargers, power bricks, and other electrical components.
Before drilling into office furniture, map the entire route. Mark mounting points, cable entry locations, and where major groups need to leave the tray.
This prevents a common mistake where the tray is mounted first and somebody later realizes it blocks a drawer, desk frame, or monitor-arm clamp.
Temporarily hold the tray in position and inspect it from the normal sitting area. Check knee clearance

- Five-foot wire tray manages long cable runs efficiently.
- Eight-inch-wide basket provides generous room for cable bundles.
- Zinc-plated steel construction supports demanding cable management installations.
- Open wire mesh allows easy cable access and rerouting.
- - Suitable for network, fiber optic, and workstation cabling.
This is built for cable runs that need more than a few clips
The Kable Kontrol cable tray takes the number two position in our Best Cable Organizer comparison because it handles cable management on a much larger scale than ordinary desk clips, sleeves, and adhesive channels. Its wire mesh construction provides a long, open pathway where power cords, Ethernet cables, fiber optic lines, display cables, and other wiring can be supported instead of hanging loosely.
The tray measures 5 feet long, 8 inches wide, and 2 inches high. That five-foot length provides substantial coverage, particularly underneath large desks, shared workstations, network installations, equipment areas, and other places where cables need to travel some distance before reaching their destination.
The 8-inch width is just as important. Narrow cable baskets can become crowded quickly once you add a power strip, laptop charger, two monitor cables, Ethernet, USB connections, speakers, and the other equipment found around a modern workstation.
This wider basket gives you space to organize cables into separate groups. Network cables can occupy one area while power and peripheral cables follow another route where appropriate for the installation.
Extra width makes future changes easier, because the tray does not need to be packed completely full on the first day. That matters more than it sounds.
A workstation rarely stays exactly the same. Somebody adds another monitor, changes the computer, installs a docking station, moves to wired Ethernet, or adds charging equipment, and suddenly the original cable organizer has no capacity left.
Leaving some unused room allows the system to grow. You can add another cable without rebuilding everything underneath the desk.
The zinc-plated steel construction also separates this product from lightweight plastic cable organizers. The steel basket provides structural cable support rather than simply bundling several cords together.
That makes it useful beyond ordinary home-office cable management. Network and fiber optic installations can benefit from a defined cable pathway where runs remain supported and accessible.
The open wire mesh makes maintenance much less frustrating
An enclosed raceway can produce a very clean appearance, but it becomes less convenient when the cable layout changes. Covers need to be opened, cables removed, and new wiring fed through limited entry points.
An open wire tray behaves differently. You can access cables along the entire route, which makes adding, removing, tracing, and reorganizing connections considerably easier.
Imagine an office desk with two monitors and a desktop computer. Six months later, the employee receives a laptop dock and needs another USB-C cable, power adapter, Ethernet connection, and display cable.
With an open basket, those additional cables can be placed into the existing route. There is no need to dismantle a closed channel just to add one connection.
The same benefit applies to troubleshooting. If one Ethernet cable stops working, you can physically follow its route through the basket and identify where it goes.
Visible cable paths simplify troubleshooting, particularly when several cables have similar connectors and identical outer jackets.
Labeling is still worth doing. A network installation containing ten similar Ethernet cables becomes much easier to maintain when both ends identify their destination.
Use labels that describe something meaningful, such as a workstation, room, access point, or device. Random numbers are less helpful if nobody maintains a separate reference sheet.
Reusable hook-and-loop straps can also help keep groups separated inside the basket. They pass easily around the wire mesh and can be reopened when the layout changes.
Do not tighten cable bundles excessively. The goal is to keep cables organized, not compress them into the smallest possible bundle.
This is especially important with network and fiber optic cabling. Fiber needs an appropriate bend radius, and network cables should not be crushed or forced sharply around corners.
The open tray gives cables room to follow smoother curves when entering or leaving the basket. Still, proper routing depends on the installer.
A cable tray does not make a sharp bend safe simply because the cable physically fits. Protect cable bend radius during installation, particularly with fiber optic runs.
For an under-desk setup, another major benefit is getting cables away from the floor. Loose cords under a workstation are easy targets for chair wheels, shoes, vacuum cleaners, and robot vacuums.
A chair caster repeatedly rolling across a cable can eventually damage the jacket or internal conductors. Even before that happens, the cable becomes an annoyance every time the chair moves.
Raising the cables into a tray solves that basic problem. The floor becomes easier to clean and the workstation looks considerably more organized.
Keeping cables elevated protects them from traffic, especially around frequently used office chairs and shared workstations.
Standing desks make cable organization more complicated because the desktop moves. Cables need enough slack to reach maximum height without pulling against their connectors.
A wide cable basket can store much of that controlled slack underneath the desktop. The cables stay organized while enough length remains available for movement.
Before securing everything, raise the desk to its maximum position. Watch every cable carefully.
Test the complete standing desk movement before tightening cable straps or finalizing the installation. If a cable becomes taut, change the routing or provide more slack.
Then lower the desk fully and check what happens to the extra length. The cable should return into a controlled path rather than dropping into a chair or becoming caught in the desk frame.
This is one situation where the 8-inch basket is particularly useful. Extra cable length can sit inside the tray rather than hanging underneath the desk.
Why this cable tray takes second place instead of first
This Kable Kontrol tray provides many of the same qualities we want from our number-one cable organizer: substantial length, wide cable capacity, zinc-plated steel construction, and an open mesh design that works for network and fiber optic cable management. It is a serious cable-routing solution rather than a small cosmetic accessory.
We placed it second because our top-ranked Kable Kontrol configuration offers the stronger overall package for the larger installation scenario considered in this comparison. This second-place option still provides excellent cable capacity, but the number-one configuration gives us a slightly more compelling overall installation package.
For an individual installation, that distinction may matter very little. What matters more is whether the quantity and dimensions suit the actual desk, office, or network route.
Measure before ordering. Five feet is a substantial tray length, and it does not make sense underneath every desk.
A compact writing desk may only need a much shorter basket. A long office desk, conference workstation, equipment bench, or network cable run can take much better advantage of the full length.
Match the tray length to the installation rather than assuming larger is automatically better.
The same principle applies to the 8-inch width. That space is valuable when several cables and adapters need support, but it also means the basket occupies a meaningful area underneath the mounting surface.
Check knee clearance before installation. A cable organizer should remove clutter without creating a new object that repeatedly hits your legs.
Also look for drawers, desk-frame crossbars, standing-desk motors, control boxes, and monitor-arm clamps. Those components can compete for the same mounting area.
Plan the mounting position before drilling, particularly underneath expensive office furniture.
Desktop thickness needs to be checked too. Using screws that are too long can damage or penetrate the upper surface.
Some desks are also hollow inside. Others use particleboard, solid wood, metal reinforcement, or composite construction.
The appropriate mounting method depends on that structure. A heavy-duty steel tray only performs properly when its mounting points are secure.
The mounting surface matters as much as the tray. Do not assume every desk can support the same installation method.
If the tray is being installed as part of building or commercial network infrastructure, follow the applicable installation requirements for that environment. The product listing describes suitability for network and fiber optic cable management, but the complete installation still needs to comply with relevant electrical and building requirements.
Power and communications cabling may require particular separation or routing depending on the location and installation type. Do not simply place every available cable into one basket because there is physical room.
For ordinary home-office cable management, the planning is usually simpler. You still want power and data cables arranged logically rather than thrown together randomly.
Logical cable groups make maintenance easier, even when formal separation requirements are not the main concern.
One group could contain display cables. Another could contain USB and peripheral wiring.
Ethernet cables can follow their own part of the basket. This makes tracing individual connections much faster later.
Power adapters deserve special attention because they can be considerably heavier than normal cables. Do not pile several large power bricks directly on top of network wiring.
If adapters are placed inside the cable-management system, make sure they are properly supported and have suitable ventilation. Do not bury heat-producing adapters under cables.
The open wire mesh helps airflow compared with a fully enclosed box. Still, air cannot circulate effectively if the entire tray is packed into a dense bundle.
A power strip can also be incorporated into some under-desk setups. Whether it should sit inside the tray or be mounted separately depends on its dimensions and the installation requirements.
Mounting the power strip underneath the desk can reduce the number of individual cords traveling to the floor. Most device cables can terminate near the equipment instead.
Shorter visible cable runs create a cleaner workstation, particularly with multiple monitors and a laptop docking station.
A modern dock can create a surprising amount of wiring. There may be laptop power, USB-C, Ethernet, two display cables, keyboard, mouse, external storage, audio, and other peripherals converging in one area.
The wide basket gives those cables somewhere to go immediately after leaving the dock. This keeps them from spreading across the desk or hanging toward the floor.
Keep the dock itself accessible, though. Equipment that needs frequent interaction should not disappear inside the cable tray just because it fits.
Hide cables without hiding useful controls. Good organization should make the workstation easier to use.
Monitor arms create another cable-routing consideration. The cables need enough slack for the display to move through its normal height, tilt, and extension range.
Move the monitor arm fully before securing the cable into the tray. A connection that looks perfect when the monitor is centered may become too short when the arm extends forward.
Leave controlled slack near moving components. Then route the remaining length into the basket.
Moving hardware needs additional cable slack, whether it is a monitor arm or a standing desk.
Do not use the cable connector itself as the strain relief. HDMI, DisplayPort, USB-C, and Ethernet ports should not support the weight of a hanging cable bundle.
The tray should carry that weight. Leave a relaxed final section from the supported cable path into the device.
This is particularly important behind desktop computers where several thick cables can pull downward together. Supporting them earlier in the route reduces strain at the ports.
Support the cable before it reaches the device, rather than allowing connectors to carry unnecessary weight.
The five-foot length also allows you to distribute cables rather than stacking everything in one small section. Spread heavier items across the available space.
This makes the installation easier to inspect and reduces dense tangles. It also leaves more room for future cables.
Do not fill the tray completely just because the space exists. Some spare capacity is useful.
Future expansion should be part of the plan, especially in offices where hardware changes regularly.
A new employee may need another monitor. A desktop could be replaced by a laptop dock.
The network may move from WiFi to Ethernet. A webcam, microphone, charger, or external drive may be added later.
If the cable organizer has no spare room from day one, every future upgrade starts undoing the original work. Leaving space avoids that.
The open basket is especially good for these later changes. New cables can enter at almost any point, rather than being forced through one opening at the end of an enclosed raceway.
This is also useful for shared desks. One workstation's cables can exit earlier while another group continues along the tray.
For network runs, the same idea allows cables to branch toward different devices. The basket acts as a common route rather than a sealed conduit.
Use gentle curves where cables leave the tray. Sharp turns create unnecessary strain and can be particularly problematic for fiber.
Give cables enough room to change direction, especially at entry and exit points.
Reusable hook-and-loop straps work well for maintaining those groups. They can be loosened or moved as the installation evolves.
Zip ties are another option, but avoid pulling them excessively tight. A neat bundle does not need to be compressed.
When cutting old zip ties, be careful not to nick the insulation of the cable underneath. A small pair of appropriate cutters is safer than blindly pushing a blade into a dense bundle.
Maintainability matters after installation day. Cable management should make future work easier, not lock everything permanently in place.
For home offices, one immediate benefit is easier floor cleaning. Robot vacuums can move underneath the desk without catching loose charging cables.
A conventional vacuum cleaner also becomes easier to use. You no longer need to pick up a collection of cords before cleaning.
Chair wheels stay away from the wiring too. This can help extend cable life and prevent accidental disconnections.
Getting cables off the floor solves several problems at the same time: appearance, cleaning, accidental pulling, and repeated contact with chair casters.
The result can also make a standing desk look considerably cleaner when raised. The underside of the desk becomes much more visible at standing height.
A tray keeps the majority of the wiring close to the desktop instead of exposing a collection of hanging loops. Only the required moving cable bundle needs to travel toward fixed power or network connections.
Use a controlled sleeve or another appropriate organizer for that moving section if needed. Make sure it can flex through the full height range.
Standing desks need both fixed and moving cable zones. The tray handles the fixed under-desk section particularly well.
Another practical use is behind entertainment or media workstations. Multiple monitors, speakers, networking equipment, and computers can create the same cable problems as an office.
A long tray can keep those connections elevated and accessible. The open design is particularly useful when hardware is swapped regularly.
Creative workstations often change peripherals more frequently than ordinary office desks. Cameras, card readers, external drives, audio interfaces, and display equipment come and go.
Open cable management suits changing equipment, because one connection can be replaced without disturbing everything else.
The zinc-plated finish also makes sense for a functional infrastructure product. The goal is corrosion resistance and durability rather than decorative appearance.
Under a desk or in a network area, the tray does not need to be visually elaborate. It needs to remain rigid and support the cable route.
That practical construction contributes to the high ranking. This is a product designed around managing real cable volume rather than merely making a few charging cords look neater.
Capacity and accessibility are its biggest strengths, and both matter when the cable count starts increasing.
There is still a place for smaller organizers. Adhesive clips are excellent for keeping one charging cable from falling behind a desk.
A flexible sleeve can make a small group of cables look cleaner. An enclosed raceway can hide wiring completely along a wall.
This Kable Kontrol tray addresses a different problem. It is for situations where many cables need a supported pathway and future access remains important.
Choose the organizer around the cable volume, not around which product looks smallest in a photograph.
Before installation, lay the cables out roughly where they need to travel. This reveals where the basket should begin and end.
Mark any places where major groups enter or leave. Check that the tray will not interfere with desk hardware.
Then verify mounting points and surface thickness. Taking a few minutes here can prevent drilling in the wrong location.
Planning first produces a cleaner final installation, particularly with a five-foot steel tray that is less forgiving than a small adhesive clip.
Once installed, route the largest or least flexible cables first. Smaller cables can then be organized around them.
Do not cross cables unnecessarily. A simple parallel route is usually easier to maintain.
Group cables according to destination or function and label important network runs. Leave enough slack at both ends for equipment movement and maintenance.
A neat tray should still be serviceable, because eventually something will need to be unplugged, replaced, or rerouted.
We believe this Kable Kontrol cable tray deserves the number two ranking out of seven for Best Cable Organizer because its five-foot length, 8-inch width, 2-inch height, zinc-plated steel construction, and open wire mesh format

- Nine integrated power outlets support demanding multi-device desk setups.
- Under-desk positioning helps remove adapters from floor areas.
- Surge protection adds useful protection for connected office equipment.
- Multiple power outlets support monitors, computers, and desk accessories.
- - Centralized power management reduces long individual cable runs significantly.
This organizes the part of desk cabling that usually creates the biggest mess
The Desky power rail takes the number three position in our Best Cable Organizer comparison because it approaches cable management from the power side of the desk. Instead of simply gathering loose cords together, it gives multiple devices a centralized place to connect, which can substantially reduce the number of individual power cables running toward a wall outlet.
That difference matters on a modern workstation. Power cables create a surprising amount of clutter once you have two monitors, a computer or laptop dock, speakers, chargers, lighting, and other powered accessories sharing the same desk.
A conventional power strip left on the floor technically solves the electrical connection problem, but every device cable still has to travel from the desktop down to that strip. You end up with several cords hanging behind the desk, collecting on the floor, and moving whenever the desk or equipment moves.
Putting the power distribution closer to the workstation changes the cable path. Shorter device cords can remain around the underside of the desk, while the rail's main power connection handles the longer run toward the outlet.
Centralized power makes cable routing simpler, particularly when several devices are concentrated around the same workstation. Instead of organizing every power cord as a separate floor-level run, you can manage most of them underneath the desktop.
This becomes even more useful with a standing desk. The power rail can move with the desktop when mounted as part of the desk setup, so individual device cables do not need enough length to reach a fixed power strip on the floor.
The important cable then becomes the main power connection between the moving desk and the fixed wall supply. That connection needs enough slack for the complete height range.
Before finishing the installation, raise the desk fully and watch the cable. Always test the desk at maximum height before tightening ties or finalizing cable lengths.
If the power cable becomes taut, stop and provide more slack. Connectors and sockets should never function as mechanical strain relief for a moving desk.
The power rail works best when the whole desk is planned around it
A power rail can remove a lot of clutter, but placement matters. Put it somewhere that keeps plugs accessible without positioning bulky power adapters where they interfere with your knees or desk hardware.
Look underneath the desk before installing anything. Standing-desk motors, control boxes, crossbars, drawers, monitor-arm clamps, and cable trays can all compete for the same space.
Plan the entire underside before mounting, especially if you intend to combine this Desky rail with a separate wire basket or cable-management tray.
A good arrangement might place the power rail toward the rear of the desk and a cable tray beside it. Device cords connect to the rail, while excess cable length sits inside the tray instead of hanging down.
This works particularly well for dual-monitor setups. Each monitor normally has power plus HDMI, DisplayPort, or USB-C cabling, so two screens can quickly produce four or more visible cords.
Keep the monitor power connections close to the rail. Route the video cables separately toward the computer or dock.
Separate logical cable groups where practical, because troubleshooting becomes easier later. If one monitor loses video but still has power, you can identify the relevant cable without digging through one dense bundle.
A laptop docking station creates another good use case. Docks can have power, Ethernet, USB peripherals, audio, and several display connections all meeting in one small area.
The dock's power adapter can connect close to the desk rather than sending another cable down to a floor strip. Other dock connections can enter a cable tray or sleeve from the same area.
This creates a cleaner central hub. The desk becomes easier to disconnect and service because most of its electrical connections remain together rather than spreading across the room.
The surge protection element adds another practical feature. Sensitive workstation equipment can benefit from an appropriate level of surge protection, particularly computers, displays, docking stations, and other electronics.
Surge protection should not be confused with battery backup. A surge-protected power rail does not necessarily keep equipment running during an outage.
If uninterrupted operation matters, a suitable UPS is a different category of device. Surge protection and backup power solve different problems, and businesses should not assume one automatically provides the other.
It is also important not to overload the power rail. Check the product's electrical rating and the requirements of the devices being connected.
A monitor and laptop charger draw very differently from high-power appliances. A cable-management product being physically able to accept several plugs does not mean electrical load can be ignored.
Stay within the stated electrical rating and use the rail for the type of workstation equipment it is intended to support.
Large power adapters deserve some planning too. Wide charging bricks can block neighboring outlets depending on their orientation.
Before mounting the rail permanently, connect the equipment you expect to use. Check whether every adapter fits comfortably without forcing cables into awkward angles.
If one oversized adapter occupies too much space, consider whether it can be positioned differently while remaining properly supported and ventilated. Do not stack heavy adapters on top of other cables.
Power bricks need ventilation and support, particularly adapters that become warm during normal use.
The goal is an organized electrical setup, not an extremely dense one. Leaving a little room around connectors makes future changes easier.
Why the Desky takes third place rather than our top position
The Desky power rail is highly effective at managing power cables, but it is more specialized than the two Kable Kontrol wire trays above it. Those products can physically route a much wider range of cables, including network, fiber optic, display, USB, and power wiring across long runs.
This Desky product focuses more heavily on consolidating electrical connections. It solves power clutter extremely well, but it does not completely replace a cable basket when a workstation has substantial data and peripheral cabling.
That is why combining the two types of organizer can work so well. The power rail handles the electrical connections, while a wire basket supports excess cord length and non-power cables.
Think of a workstation with two monitors, a desktop computer, speakers, webcam, microphone, Ethernet connection, USB hub, and charging cables. The Desky rail can centralize the powered devices, but HDMI, DisplayPort, Ethernet, USB, and audio cables still need somewhere to go.
A cable tray completes the organization when the workstation contains a large number of non-power connections.
For a simpler desk, though, the power rail may do most of the work by itself. A laptop, monitor, desk lamp, and phone charger do not create an enormous amount of data cabling.
In that situation, moving the power connections off the floor can transform the setup quickly. There are fewer cords hanging down and less equipment sitting underneath the desk.
This also helps with cleaning. Vacuum cleaners and robot vacuums can move underneath the workstation without encountering a loose power strip and several adapters.
Removing electrical clutter from the floor makes routine cleaning easier and reduces the chance of something being pulled accidentally.
Office chairs are another problem. Power cables and extension leads should not sit where chair casters repeatedly roll across them.
Moving those connections upward reduces exposure to everyday mechanical wear. It also removes one common tripping point around the workstation.
For standing desks, keeping the power distribution attached to the moving portion can simplify cable movement considerably. Device cords travel with the desk rather than stretching between moving equipment and a fixed floor-level strip.
One controlled moving power cable is easier to manage than several individual device cords descending toward the floor.
Still, that main cable needs careful routing. Leave a smooth path that does not become trapped between desk-frame components.
Cycle the desk several times after installation. Watch the cable at the lowest, middle, and highest positions.
A cable may look fine at both extremes but rub against a crossbar halfway through the movement. Testing the full travel reveals those problems.
Check the entire movement path, not only the two end positions.
Monitor arms need similar attention. If the monitor power cable runs to the Desky rail, leave enough slack for the arm to extend, raise, tilt, and rotate normally.
Move the monitor through its complete adjustment range before securing the cable. A tight cable can restrict the arm or place strain on the monitor's power connector.
Once the required movement slack is known, route the remaining cable neatly toward the rail. Hook-and-loop straps are useful because they can be reopened later.
Reusable ties make future upgrades easier, particularly on workstations where monitors and peripherals change regularly.
Avoid using extremely tight plastic zip ties around delicate cables. Cable management should guide wiring rather than crush it.
If zip ties are used, leave them slightly relaxed. Be careful when cutting them during future changes.
For desktop computers, consider where the tower sits. A computer on the floor may still need power from the desk-mounted rail, which creates a moving connection if the desk height changes.
Fixed equipment needs special consideration on standing desks. A desktop tower that stays on the floor does not move with the power rail.
In that case, it may be more sensible for some equipment to use a fixed power source. The ideal arrangement depends on what moves and what remains stationary.
A computer mounted underneath the desktop can move with the desk and simplify this relationship. But the mounting hardware must support the computer securely.
Do not redesign the entire workstation purely to hide cables. Function and safety remain more important than having nothing visible.
Good cable management should improve usability, not create an installation that is difficult to maintain.
Accessibility is particularly important with a power rail. You may need to unplug a monitor, reset a power adapter, or connect temporary equipment.
Do not mount the rail somewhere that requires crawling underneath the desk with a flashlight every time a plug needs changing. Hidden does not need to mean inaccessible.
A rear under-desk position can work well if the outlets remain reachable from the side. Test access before final installation.
Place outlets where maintenance remains practical, because workstation hardware changes over time.
Labeling can help when several similar adapters are connected. A small label near each cord can identify the monitor, dock, speakers, or other device.
This is useful when troubleshooting. Instead of unplugging devices one by one to find the correct adapter, you already know which cable belongs to what.
For office deployments, consistent labeling across multiple desks becomes even more valuable. IT staff can service a workstation without guessing how the previous employee arranged it.
Labels make organized cables easier to maintain, which is the part of cable management people often forget.
The same principle applies to cable length. Do not use a three-meter extension when a much shorter connection would comfortably reach.
Excess cable has to be stored somewhere, and large loops can quickly fill an under-desk tray. Choose appropriate lengths when replacing cables.
At the same time, avoid cables that barely reach. Some slack is necessary for equipment movement and servicing.
Use enough slack without creating large coils. That balance keeps the installation clean and functional.
If the desk has a rear cable channel or grommet, use it to guide desktop cables toward the power rail. This keeps cords away from the front edge and working area.
Monitor cables can descend behind the screens rather than crossing the desk surface. Laptop charger cables can approach from the side closest to the dock.
The power rail becomes the central endpoint for those routes. This is much cleaner than every device independently finding its way to a wall outlet.
Centralized routing creates a more predictable workstation, especially when equipment is regularly disconnected and reconnected.
The Desky can also help with home-office aesthetics. A desk with several expensive monitors and a clean desktop can still look unfinished when a large power strip and six adapters are visible underneath.
Moving those components into a deliberate under-desk arrangement cleans up the view from normal standing and sitting positions. This is particularly noticeable with open-frame standing desks.
Do not sacrifice airflow or accessibility purely for appearance, though. An adapter hidden in an enclosed space can become warmer than expected.
Clean appearance should not compromise ventilation, especially around power supplies and charging equipment.
Dust also accumulates around floor-level power strips. Raising the electrical connections can reduce direct exposure to floor dust and make cleaning around the workstation easier.
The rail itself still needs occasional inspection. Make sure plugs remain fully seated and cables have not become trapped or damaged.
After moving the desk or changing hardware, inspect the cable paths again. A cable can shift during equipment changes.
Recheck routing after major workstation changes, particularly when new monitors, docks, or computers are installed.
For shared offices, this kind of power management can also simplify workstation turnover. The rail remains installed while laptops, monitors, and accessories change.
New employees can connect equipment without rebuilding the electrical arrangement from scratch. Standardizing the setup can reduce random extension cords appearing around desks.
This is one area where the Desky becomes more than a cosmetic organizer. It creates a defined place for workstation power.
A fixed power location encourages consistent setups, especially across multiple office desks.
Surge protection is another reason the product earns a high ranking. Computers and monitors represent a meaningful investment, so adding an appropriate layer of electrical protection to the cable-management system is useful.
Still, surge protection devices have limits and specifications. Check the product documentation and understand what protection is actually provided.
Do not assume that surge protection means every electrical event is covered. Lightning, building wiring faults, and major power problems can involve conditions beyond what an ordinary workstation protector is designed to handle.
Use surge protection as one protective layer, alongside properly installed building electrical systems and suitable equipment practices.
If the workstation contains mission-critical equipment, consider whether a UPS is appropriate. A UPS can provide temporary battery power during an outage and may include additional power-conditioning features depending on the model.
That is a separate purchase decision. The Desky rail's main job here is organized power distribution with the protection features specified for the product.
Another practical consideration is plug orientation. Large adapters sometimes extend sideways and block neighboring outlets.
Test your actual adapters before final mounting. A product specification showing several outlets does not guarantee that every oversized charger can occupy them simultaneously.
If necessary, rearrange the largest adapters before smaller plugs are connected. This can preserve more usable outlets.
Do not use unnecessary chains of adapters or extension devices just to fit everything. Keep the power arrangement as straightforward as practical.
The number-three ranking comes from this combination of organization and electrical functionality. The Desky does more than hold cables together.
It reduces cable clutter at the source by giving powered equipment a centralized connection point close to the desk.
That is different from our first two Kable Kontrol products, which excel at physically supporting and routing long cable runs. Those trays are more versatile for mixed network, fiber, data, display, and power cabling.
The Desky is stronger when the biggest problem is power distribution. For many modern desks, that is exactly where most of the clutter begins.
A dual-monitor home office is a good example. Two monitor power cables, laptop power, speakers, lamp, phone charger, and perhaps a USB hub can create seven separate electrical connections.
One organized power rail simplifies that entire group, especially when mounted close to the devices using it.
Data cables still need routing, but those can often be handled with a smaller basket or a few reusable straps. The overall cable-management system becomes much easier to understand.
This modular approach can be better than forcing every type of cable into one organizer. Power distribution and cable routing are related but not identical jobs.
For installation, begin by placing the devices where they will actually stay. Do not design the cable system before deciding where the monitor, computer, dock, and peripherals belong.
Equipment placement should come before cable routing. Otherwise you may finish the installation and immediately need to move everything.
Next, identify which equipment moves. A standing desktop moves vertically, a monitor arm moves in several directions, while a floor computer may remain stationary.
Provide appropriate slack for each moving connection. Then route fixed cables more tightly and neatly.
Mount the rail only after confirming the location works with every major plug and adapter. Check desk thickness and the supplied mounting method before drilling or fastening anything.
A secure installation starts with the right mounting surface, particularly when several adapters will place weight on the rail.
After installation, connect devices one group at a time. This makes it easier to create logical cable routes rather than dropping every cord into the same area.
Use reusable ties to control excess length. Avoid wrapping cables into extremely tight circles.
Leave connectors relaxed. There

- 40U vertical design organizes full-height server rack cabling.
- Finger ducts separate network cables into manageable routing groups.
- Removable cover conceals wiring while maintaining convenient service access.
- High-capacity channel handles dense Ethernet and patch cable installations.
- - Rack-mounted design keeps cables away from equipment airflow paths.
This is a different kind of cable organizer, built for the rack instead of the desk
The StarTech.com CMVER40UF takes the number four position in our Best Cable Organizer comparison because it is designed for a much more specialized job than an under-desk tray or power rail. This is a 40U vertical finger duct cable manager intended for server racks, network cabinets, patch panels, switches, and other environments where dozens of cables may need to travel vertically through the same equipment area.
That changes what good cable management means. Rack cabling needs organization and service access, not simply a cleaner appearance, because technicians need to identify connections, replace equipment, trace patch cables, and make changes without disturbing everything around them.
The 40U format gives the organizer substantial vertical coverage along a rack. Instead of allowing patch cords to hang down the front or side of network equipment, the cables can enter the organizer and follow a controlled vertical route.
The finger-style design is important here. Cables can enter and leave the channel at different heights, so a patch cord connected near the top of the rack does not need to follow the same exit point as one connected twenty rack units lower.
The fingers create multiple cable entry points, which is exactly what you want beside switches and patch panels positioned throughout a tall rack.
Imagine a rack with several 24-port or 48-port switches. Without proper vertical cable management, patch cables can begin crossing over one another until the ports themselves become difficult to access.
A vertical organizer gives those cables somewhere to go immediately after leaving the equipment. Short horizontal sections lead toward the cable manager, then the longer part of the run travels vertically inside the channel.
That can make a big difference when one switch eventually needs replacement. Organized patch cables make hardware easier to service because technicians are not fighting through a dense curtain of unrelated wiring just to reach mounting screws and ports.
The removable cover adds another practical layer. Once the cables are routed, the cover can conceal much of the wiring while still allowing the organizer to be reopened when maintenance is required.
The finger ducts make dense network cabling much easier to control
A server rack can accumulate cable very quickly. One 48-port patch panel connected to one switch already creates dozens of individual patch cords, and larger installations may repeat that arrangement several times.
The problem is not only visual clutter. Poor cable routing makes troubleshooting slower, because following one Ethernet cable through a dense bundle becomes unnecessarily difficult.
The CMVER40UF creates a defined vertical path. Patch cables can be grouped and directed through the fingers closest to the equipment they serve.
This helps prevent cables from hanging directly across switch faces. Status lights remain easier to see, ports remain easier to reach, and equipment can be inspected without first moving a large bundle.
Airflow is another practical consideration in rack installations. Network and server equipment depends on unobstructed ventilation, so large unmanaged cable bundles should not be allowed to sit across air intakes or exhaust areas.
Structured routing helps protect equipment airflow, particularly in racks where switches, servers, UPS equipment, and other heat-producing hardware are operating continuously.
A vertical cable manager does not automatically fix bad airflow, obviously. Cables still need to enter and leave equipment sensibly.
The useful part is that the organizer provides a destination for excess routing. Instead of leaving cable loops directly in front of equipment, the longer sections can be controlled along the side of the rack.
Patch cable length matters too. Do not use a ten-foot cable for a connection that only needs two feet unless there is a real reason.
Correct cable lengths reduce unnecessary bulk, which leaves more capacity inside the organizer and makes individual runs easier to trace.
At the same time, cables should not be stretched tightly between ports. Some service slack is necessary so equipment can be accessed without pulling on connectors.
The goal is controlled slack. Too little places tension on ports, while too much creates large loops that consume space and hide other cables.
This is particularly important around RJ45 connectors. The connector should make the network connection, not support the weight of a large hanging cable bundle.
Support cable weight before the connector, allowing a relaxed final section to reach the switch or patch panel.
The finger ducts can help guide that final section. Cables exit close to the rack unit where they are needed instead of traveling diagonally across several pieces of equipment.
For larger installations, grouping cables logically makes the organizer even more useful. You might group connections according to switch, patch panel, floor, department, or another system that matches the network design.
Labels should support that system. A beautifully routed cable is still difficult to troubleshoot if nobody knows where it goes.
Label both ends of important network cables, especially when several cables have identical colors and connectors.
Use labels that correspond to something meaningful in the network documentation. Random handwritten numbers are less useful if nobody can find the reference later.
Color coding can also help, but it should be consistent. One color might identify access points while another is reserved for workstations, uplinks, cameras, or management connections.
Do not create an overly complicated color system that nobody remembers. The best scheme is one technicians can understand quickly.
Consistency matters more than having many colors, particularly in a rack that several people may service over its lifetime.
The removable cover helps once the routing is finished. It gives the rack a cleaner appearance and keeps the cable path visually contained.
But do not use the cover as an excuse to hide a badly organized bundle. The inside should still be serviceable when the cover comes off.
Cables should not explode outward every time the organizer is opened. If that happens, the channel is probably overfilled or the routing needs improvement.
Why the StarTech.com organizer finishes fourth in our ranking
The CMVER40UF is excellent for its intended environment, but that environment is much narrower than the products in our top three. The Kable Kontrol trays above it can manage mixed cable runs across desks, offices, network areas, and other installations, while the Desky power rail solves a common workstation power-management problem.
This StarTech.com model is different. It is primarily a rack cable management solution, so it becomes extremely useful when you have a 40U-class equipment rack but unnecessary for somebody trying to organize six cables underneath a home-office desk.
That specialization is the main reason for the fourth-place position. It is not really a weakness in construction or concept.
If your actual problem is a network rack full of patch cables, this may be more appropriate than every product ranked above it. The ranking reflects general cable-organizer usefulness rather than pretending every installation has identical requirements.
The 40U vertical layout is especially useful beside high-density patch panels. A rack containing hundreds of network connections needs somewhere for those cables to transition between horizontal equipment and the vertical route.
The organizer keeps those transitions controlled, and the individual fingers provide frequent points where cables can enter or leave.
When planning the installation, consider which side of the rack should receive the organizer. Equipment port positions and existing cable routes can affect whether left-side, right-side, or dual vertical management makes the most sense.
Some dense installations may benefit from a vertical organizer on both sides. This can divide the cable volume rather than forcing every connection through one channel.
Do not automatically fill one organizer to maximum capacity. Future expansion needs room too.
Leave capacity for future patch cables, especially if the rack is expected to gain switches, servers, access points, cameras, or other network equipment later.
A network rack that is already completely full on installation day becomes difficult to maintain. The same principle applies to the cable-management channels around it.
Plan for equipment replacement as well. A future switch may have its ports arranged differently from the current one.
Leaving some routing flexibility makes that change easier. Extremely tight cable bundles can turn a simple switch replacement into a larger rewiring job.
Serviceability should be designed from the beginning, rather than added after something fails.
Another common mistake is pulling patch cables too tightly through the fingers. Network cables should follow smooth routes without sharp bends.
Twisted-pair Ethernet cable has bend-radius considerations, and the connectors should not be pulled sideways. Give the cable enough room to change direction naturally.
This becomes even more important if fiber is routed nearby. Fiber optic cabling requires careful bend management and should never be forced around a tight corner simply to make the rack look cleaner.
Neat routing should never damage the cable. Function comes before visual perfection.
Separate cable types according to the requirements of the installation. Power and data management may need different routes depending on rack design and applicable standards.
The vertical organizer is primarily useful for structured cable routing, but the complete rack layout needs to be planned as a system. Consider patch panels, switches, horizontal managers, power distribution, servers, and airflow together.
A vertical organizer often works best alongside horizontal cable managers. The horizontal manager handles the transition immediately above or below equipment, while the vertical organizer carries cables along the rack height.
Horizontal and vertical management can work together, particularly in racks containing several densely populated patch panels.
This prevents long patch cords from stretching diagonally across the equipment. Each cable follows a more predictable route.
That predictability helps during troubleshooting. A technician can follow the cable into the horizontal manager, through the vertical channel, and toward its destination.
Documentation becomes easier as well. Cable IDs can correspond with patch-panel ports and switch ports rather than relying on somebody remembering where each cable disappears.
Good cable management supports good documentation, and the two become more valuable as network size increases.
Rack maintenance is another area where the cover design helps. When the system is operating normally, the cover keeps the cable bundle contained.
When changes are required, remove the cover and access the cables. There is no need to cut open a sleeve or dismantle an enclosed permanent raceway.
This is useful in environments where network connections change regularly. Offices move employees, replace switches, add wireless access points, and expand security systems.
Easy access reduces the cost of future changes, because technicians spend less time fighting the cable-management hardware itself.
Patch cables should still be routed methodically inside the organizer. Do not push every spare loop into the nearest available space.
If a cable is much longer than necessary, replacing it with an appropriate length can be cleaner than storing several feet of excess inside the channel.
Keep enough slack for maintenance but avoid huge coils. This preserves capacity for other cables.
Use cable length as part of the organization strategy, not as something to think about after the rack is already full.
For new installations, it can help to route cables in stages. Start with one patch panel or equipment group rather than filling the entire organizer randomly.
Test the path and make sure the cover still fits comfortably. Then continue with the next group.
This reveals capacity problems early. Discovering that the cover cannot close after hundreds of cables are installed is much harder to fix.
Build dense cable routes in logical stages, especially when working with a full-height rack.
The 40U size also means installation alignment matters. The organizer should sit properly relative to the rack equipment so cables can reach the fingers without awkward angles.
Measure before tightening everything permanently. Make sure rack doors, side panels, and nearby equipment still operate correctly.
Check whether the rack has enough clearance for the organizer and its cover. Network cabinets vary considerably in internal width and accessory mounting options.
Verify rack compatibility before installation, rather than assuming every full-height cabinet uses identical accessory clearances.
The organizer can also improve the appearance of customer-visible equipment areas. Some offices and studios have network racks in spaces where clients or employees can see them.
A covered vertical manager produces a more deliberate appearance than hundreds of patch cords hanging openly beside the equipment. This is secondary to serviceability, but still useful.
More importantly, the cover helps keep the cable bundle contained. Loose loops are less likely to protrude into areas where they can be snagged.
Contained cables are less likely to be disturbed, particularly around racks that receive frequent maintenance.
Be careful not to force the cover onto an overfilled organizer. If it requires significant pressure to close, the cable volume or routing probably needs attention.
Compressing cables simply to fit the cover can create unnecessary stress. Add another management path or reduce excess cable instead.
Heat should also be considered in the overall rack design. The organizer itself does not generate meaningful heat, but dense cable bundles can influence airflow around nearby equipment.
Keep switch vents and server airflow paths clear. Cable management should support cooling rather than obstruct it.
This is especially important in small network closets where ambient temperature may already be elevated. Equipment reliability can suffer when ventilation is poor.
Do not allow patch cords to drape over fans or exhaust openings. Route them toward the organizer as soon as practical after leaving the device.
For PoE networks, switches may be supplying substantial power to cameras, access points, phones, and other devices. Cable and thermal management should follow the requirements appropriate to the installation.
High-density networks need thoughtful planning, particularly when many powered connections occupy the same rack.
The CMVER40UF can also help when replacing equipment. Suppose a 48-port switch fails and needs to be removed.
If its cables are routed through a defined manager and labeled correctly, technicians can disconnect and preserve those cable groups without turning the entire rack into a loose bundle. The replacement switch can then be connected methodically.
Without cable management, dozens of patch cords may fall across the empty rack space as soon as the old switch is removed. That makes installation of the replacement much harder.
Organized cabling simplifies hardware replacement, which is one of the less obvious reasons rack cable management matters.
The same benefit applies during troubleshooting. If one switch port is behaving strangely, technicians need direct access to the connector and status indicators.
Cables routed across the face of the switch can obscure LEDs and labels. Vertical management helps keep those front panels clearer.
For patch panels, port labels remain easier to read too. This supports faster tracing and reduces accidental disconnections.
Clear equipment faces improve maintenance speed, particularly in racks with several nearly identical devices.
Another useful practice is documenting major cable groups before the cover goes on. Take photographs of the organized routing and save them with network documentation.
This gives future technicians a reference for how the rack was intended to be arranged. It can be useful after several years of gradual changes.
Update the documentation when major rewiring occurs. An outdated diagram can be more confusing than having no diagram at all.
Documentation should evolve with the cabling, especially in business networks that change regularly.
The fourth-place ranking therefore comes down to versatility. The StarTech.com organizer is excellent at one demanding job, but it is not intended to solve everyday cable clutter under a normal office desk.
Our first two Kable Kontrol trays can be used across a broader range of desk and infrastructure installations. The third-place Desky product directly addresses the power clutter found in modern workstations.
The CMVER40UF becomes the stronger choice once the problem moves into a server rack. For vertical rack cable management, its specialized design is an advantage, not a limitation.
That is why comparing cable organizers purely by size or price does not work very well. Different products solve completely different parts of the cable-management problem.
A small desk needs clips or a tray. A standing workstation may need a tray plus power management.
A 40U network rack needs structured vertical routing, cable fingers, labeling, and service access. That is the environment this StarTech.com model is designed around.
Choose the organizer around the installation type, because the wrong form factor can make cable management harder rather than easier.
We believe the StarTech.com CMVER40UF deserves the number four ranking out of seven for Best Cable Organizer because its 40U vertical format, finger duct design, removable cover, and high-capacity routing make it a strong solution for structured rack cabling.
It ranks below our first three because its use case is considerably more specialized. It does not replace a broad under-desk cable tray or workstation power-management system for ordinary office users.
Inside the right server or network rack, however, those limitations disappear. Route cables by logical group, choose sensible patch-cable lengths, label both ends, maintain appropriate bend radius, leave room for expansion, and keep equipment airflow clear.
Installed thoughtfully, the CMVER40UF provides professional rack cable organization that makes dense network cabling easier to trace, service, expand, and maintain

- Five-foot straight section supports long continuous cable runs.
- Eight-inch width provides generous room for multiple cables.
- Zinc-plated steel construction provides strong structural cable support.
- Open wire mesh keeps network cables accessible for maintenance.
- - Suitable for network, AV, computer, and fiber cabling.
This five-foot tray gives cables a proper route instead of just hiding them
The Kable Kontrol KK-8X2X5 takes the number five position in our Best Cable Organizer comparison because it is a proper wire mesh cable tray rather than a small desktop clip or flexible sleeve. The straight section measures 5 feet long, 8 inches wide, and 2 inches deep, giving it enough capacity for longer workstation, network, AV, and equipment cable runs.
The tray is made from zinc-plated steel and weighs around 6 pounds. The steel construction gives cables real support, which becomes important when several network, display, computer, or fiber optic cables need to travel along the same route.
Five feet is enough length to cover a large section underneath a desk or continue along a wall or equipment area. That means fewer interruptions in the cable path and less need to create several tiny management zones.
The 8-inch width matters just as much. A narrow basket can become crowded surprisingly quickly once Ethernet, USB, DisplayPort, HDMI, power cords, and other workstation cables begin sharing the same space.
Eight inches gives the cables room to sit in logical groups rather than being compressed into one dense bundle. That also leaves some capacity for equipment that gets added later.
This is particularly useful around computer workstations. A desk may begin with one monitor and a desktop PC, then gain a second monitor, docking station, Ethernet connection, webcam, speakers, chargers, and external storage over time.
If the organizer is already full on installation day, every upgrade becomes another cable-management problem. Leaving spare room makes the system easier to expand.
The open wire mesh design is another practical strength. Cables remain accessible along the entire tray, so you can add, remove, inspect, or reroute a connection without opening a long enclosed raceway.
That can save time when equipment changes. Pull out the old monitor cable, route the replacement through the same basket, secure it where needed, and the rest of the installation can remain untouched.
The open basket is especially useful when the setup keeps changing
Cable organization is easy when equipment is brand new and every connection has just been installed. The real test comes months later when somebody needs to replace one Ethernet cable buried among fifteen others.
An open wire tray lets you visually follow the cable. Visible routing makes troubleshooting much easier, particularly when the installation contains several similar cables running in the same direction.
Labels help even more. If several Ethernet runs share the tray, mark both ends with useful destinations rather than relying on cable color alone.
A label such as "Desk 3 PC" or "Access Point 2" immediately tells you what the connection serves. That becomes much more valuable in an office or network environment than a tray that simply looks tidy.
Reusable hook-and-loop ties can pass through the wire mesh to keep cable groups separated. Avoid tightening them excessively.
Cables should be supported rather than crushed, particularly structured network and fiber optic cabling. Organization should never come at the expense of cable integrity.
Fiber needs particular care around bends. The open basket provides flexibility when a fiber cable needs to enter or leave the tray, but you still need to maintain the appropriate bend radius.
Do not force a cable through a sharp ninety-degree turn just because the wire basket makes that physically possible. Use smooth curves and allow enough space around transitions.
Ethernet cabling deserves similar treatment. Excessive compression and sharp bends are unnecessary when an 8-inch-wide tray gives you room to route things properly.
Use the available width intelligently, with logical groups and enough room for each cable to follow a natural path.
For under-desk cable management, the tray can remove a large amount of wiring from the floor. This helps with appearance, but there are practical reasons too.
Office-chair casters can repeatedly roll over loose cables. Vacuum cleaners and robot vacuums can catch them, while somebody moving their feet under the desk can accidentally pull a connection loose.
Raising those cables into a basket avoids most of those problems. Getting cords off the floor protects them while making the area underneath the workstation much easier to clean.
A standing desk needs a little more planning. The desktop changes height, so any cable running between the moving desk and a fixed wall, computer, or network point needs enough free length.
Install the tray underneath the moving desktop where appropriate, then test the desk at its lowest and highest positions. Watch every cable during the complete movement.
Never finalize standing-desk cables before testing movement. A connection that looks relaxed while sitting can become dangerously tight when the desk reaches full standing height.
The tray can hold controlled excess cable underneath the desktop. This is much cleaner than allowing large loops to hang down toward the floor.
Monitor arms create a similar issue. A display cable needs enough slack for the monitor to extend, rotate, tilt, and change height.
Move the arm through its full range before securing the cable inside the basket. Then organize the remaining excess length.
Moving equipment always needs extra cable slack, otherwise the connector ends up absorbing the pulling force.
Power adapters can also be managed around a wire tray, but use some judgment. Large power bricks are heavier and may generate heat.
Do not pile several warm adapters directly on top of network cables simply because the basket is wide enough. Support them properly and preserve ventilation.
The open mesh naturally allows more airflow than a closed plastic box. Still, good ventilation requires sensible cable placement, especially around chargers and power supplies.
Why this Kable Kontrol tray finishes fifth in our ranking
This product does the fundamental cable-routing job very well, but the products above it offer stronger packages for the particular installations considered in our ranking. Our first and second choices provide especially compelling Kable Kontrol configurations, while the Desky power rail directly tackles workstation power distribution and the StarTech.com organizer provides specialized rack management.
This fifth-place model is more straightforward. It is essentially a strong five-foot cable pathway, which can actually be exactly what a specific installation needs.
The single straight-section format is worth considering before purchase. If you need to organize several desks or create a much larger cable-management system, one five-foot section may not provide the same value or convenience as a bulk configuration.
For one long workstation, though, the situation changes. A single 5-foot by 8-inch by 2-inch tray can provide a substantial amount of usable cable space without leaving several unused sections afterward.
That makes it sensible for a focused installation. Buy capacity that matches the actual project, rather than automatically choosing the largest package available.
Measure the mounting area first. Five feet is substantial, and some desks simply do not have that much uninterrupted space underneath.
Standing-desk frames can include crossbars, motors, control boxes, and moving components. Fixed office desks may have drawers or reinforcement structures underneath.
Hold the tray roughly in its intended position before drilling anything. Check knee clearance, monitor-arm clamps, desk controls, and all moving components.
Plan the mounting position before making holes. A steel tray is less forgiving than an adhesive cable clip that can simply be moved somewhere else.
Desktop thickness matters too. Screws that are too long can damage the upper surface of the desk.
Some desks also use hollow or lightweight composite construction that may require a different mounting approach. The tray is only as secure as the surface supporting it.
If it is being mounted to a wall or another building surface, identify the appropriate support points and hardware for that material. Do not rely on weak mounting simply because the cable load initially feels light.
A secure tray needs secure mounting points, especially once the cable count grows over time.
The zinc-plated steel construction is useful because it provides durability and some corrosion resistance. That makes the tray more suitable for infrastructure-style applications than a lightweight plastic organizer.
The manufacturer positions this type of tray for network, AV, fiber optic, computer cabling, and similar installations. That broad use is one of its strengths.
A home-office user might fill it with monitor, USB, Ethernet, and power connections. A network installer could use the same basic tray format to support structured cabling along a defined route.
The open design works across different cable types, although the installation still needs to follow the appropriate requirements for the cables being routed.
Power and communications cabling should not simply be mixed randomly. Applicable electrical requirements and installation practices may determine how different cable types need to be separated.
For a simple desk, logical grouping is still useful even where formal separation is not the main issue. Put related cables together so future troubleshooting is easier.
For example, display cables can occupy one side of the tray while Ethernet and USB connections use another area. This keeps the basket from becoming one tangled mass.
Organization inside the organizer still matters. Buying a large tray and throwing every cable into it randomly only moves the mess off the floor.
Use reusable straps at sensible intervals. Do not place a tie every few centimeters unless there is an actual reason.
Cables need support, but they should remain easy to remove later. Over-engineering a small workstation can make maintenance unnecessarily slow.
Service loops should also be controlled. Some extra length is useful when equipment needs to move, but several feet of unnecessary cable can consume tray capacity quickly.
Keep enough slack without storing huge coils. That balance makes the installation both tidy and serviceable.
If you are purchasing new cables at the same time, choose lengths appropriate to the route. A correctly sized Ethernet or display cable can remove a surprising amount of clutter.
Do not go too short, though. A cable that only reaches when pulled tight is worse than one with a small amount of controlled excess.
The connectors should remain relaxed at both ends. The tray should support the cable's weight rather than letting the port carry it.
Support cables before they reach equipment, particularly thick display and network bundles behind desktop computers.
For a docking station, this tray can be particularly useful. A dock may have Ethernet, power, USB, audio, and multiple monitor cables all entering the same area.
Route those connections immediately into the basket instead of letting them spread across the floor. The workstation becomes easier to understand visually.
Keep the dock itself accessible if you regularly connect temporary devices. Cable management should hide unnecessary wiring, not make useful ports difficult to reach.
Accessibility matters as much as appearance, especially on a workstation that changes frequently.
For AV equipment, the five-foot length can handle several connections running together. HDMI, speaker, network, and control cables can follow a common general route where appropriate.
Again, label cables when several identical connections are present. Troubleshooting an AV setup becomes much faster when you know which HDMI cable belongs to which device.
Network installations benefit even more from labels. Cable color can help identify categories, but a label tells you the actual destination.
Good labeling turns neat cabling into maintainable cabling, which is the more important goal over the long term.
The tray can also make future upgrades easier. If another monitor is added, its power and display cables can enter the existing pathway.
If a desktop computer becomes a laptop docking setup, old cables can be removed and new ones installed without replacing the organizer itself.
The open mesh gives you direct access throughout that process. There is no cover running the entire length that needs to be removed first.
Open access is valuable when equipment changes, which is common in offices and technical workspaces.
One downside is that the cables remain somewhat visible. If complete concealment is the goal, an enclosed raceway can produce a cleaner visual result.
But enclosed systems trade some accessibility for appearance. Adding another cable later usually requires more work.
This Kable Kontrol tray prioritizes support, capacity, and serviceability. For technical installations, that can be the better compromise.
Easy maintenance often matters more than total concealment, particularly when the cabling is underneath a desk or inside an equipment area anyway.
Another advantage of the mesh construction is that cables can enter and leave at many different points. You are not limited to predefined holes.
A monitor cable can exit near the center while Ethernet continues toward the end. This is useful on long shared workstations.
It also allows the cable path to evolve. New equipment can join the tray at the nearest practical point instead of being routed all the way from one end.
Flexible entry points make expansion simpler, especially across a five-foot section.
When cutting or modifying wire mesh tray systems, any work should be performed with appropriate tools and installation practices. Sharp edges need to be addressed so cables are not damaged.
Do not improvise modifications if you are unsure how the tray system is intended to be installed. Follow the manufacturer's instructions and use compatible accessories where required.
For professional network and building installations, this becomes even more important. Cable support needs to remain safe and compliant with the requirements of the project.
Professional installations should follow applicable standards, not simply the visual arrangement that seems neatest.
For ordinary home-office use, the process is simpler. Measure, mount securely, route cables with enough slack, and keep moving equipment in mind.
Then test everything before tightening the final straps. Move monitor arms, raise the standing desk, and make sure every device remains connected.
After a week of normal use, inspect the setup again. Cables can settle into different positions after repeated movement.
A quick follow-up inspection catches small problems before they become damaged connectors or cables rubbing against moving desk parts.
Cleaning becomes easier once the cables are elevated. A vacuum can move underneath the desk without navigating around a pile of cords.
Robot vacuums benefit even more. Loose charging and network cables can easily become caught in their brushes.
Keeping wiring inside a tray removes that risk while making the workstation look more deliberate. It is a practical improvement, not just a cosmetic one.
Floor clearance is one of the immediate benefits you notice after installing proper under-desk cable management.
The fifth-place ranking ultimately reflects the fact that this is a straightforward single-section solution in a comparison containing more comprehensive or specialized organizers. It does not mean the underlying tray design is weak.
In fact, the 5-foot length, 8-inch width, 2-inch depth, zinc-plated steel construction, and open wire mesh format cover the fundamentals very well. The product is also suitable for a broader range of cabling than a small desk-only organizer.
For one long cable run, that simplicity can be an advantage. You get a substantial steel pathway without buying a complicated system you may not need.
The tray is strongest when the route is clear: one desk, one equipment area, or one defined five-foot section where a large number of cables need support.
We believe the Kable Kontrol KK-8X2X5 deserves the number five ranking out of seven for Best Cable Organizer because it provides a durable, high-capacity route for network, AV, fiber optic, computer, and general workstation cabling.
It ranks below our first four because those products offer stronger bulk value, integrated power management, or more specialized rack organization for the scenarios considered in this comparison. This single straight section is more focused and may require additional accessories or sections for a larger installation.
For a home office, technical workspace, AV installation, or network route that actually needs a five-foot steel basket, though, it remains a very practical option. Measure the installation carefully, mount it securely, maintain proper cable bend radius, leave sensible service slack, and keep logical cable groups separated.
Used that way, the KK-8X2X5 provides durable accessible cable organization that keeps cords supported, off the floor, easier to trace, and much simpler to modify when the equipment changes later.

- Five-foot straight tray supports long continuous cable routes.
- Four-inch width provides compact structured cable organization.
- Two-inch depth helps contain multiple cables securely.
- Zinc-plated steel construction provides durable long-term cable support.
- - Open wire mesh suits network, fiber, and AV cabling.
The narrower four-inch tray makes sense when space is limited
The Kable Kontrol KK-4X2X5 takes the number six position in our Best Cable Organizer comparison because it offers the same industrial-style wire mesh approach as larger cable trays, but in a narrower 4-inch format. The straight section measures 5 feet long, 4 inches wide, and 2 inches deep, so this is still a substantial cable route even though the basket itself is fairly compact.
That narrower width is useful underneath desks or around equipment where an 8-inch or 12-inch tray would simply consume too much room. The four-inch profile keeps installation compact, while the five-foot length still provides enough continuous coverage for a long workstation or structured cable run.
The tray uses zinc-plated steel with a chrome-style finish. That gives it a more structural role than a plastic cable sleeve or adhesive cord clip.
Instead of simply tying several cables together, you are giving them a dedicated supported route. Network cables, AV wiring, computer connections, and fiber optic cables can sit inside the basket rather than hanging loosely toward the floor.
Supported cables put less strain on connectors, especially when several heavier cables leave the back of a computer, switch, monitor setup, or other equipment at the same point.
The 2-inch depth helps keep cables inside the basket while leaving them accessible from above and through the wire mesh sides. This matters later when one cable needs to be replaced.
You can trace the connection visually instead of opening a long enclosed raceway. Remove the old cable, route the replacement through the same path, and leave the rest of the installation alone.
Open mesh makes future changes easier, which is particularly useful for computer and network installations that rarely stay exactly the same for years.
A workstation may begin with one monitor and a desktop computer. Later it gets a second monitor, docking station, wired Ethernet, speakers, webcam, USB hub, and several chargers.
Having an established cable route makes those upgrades easier. You add connections to the existing system instead of creating another loose bundle underneath the desk.
Five feet of continuous routing is useful for long desks and network runs
The 5-foot length is one of the most practical specifications here. At approximately 60 inches long, the tray can cover much of the rear edge underneath a large office desk.
A long continuous route reduces cable drop points, because connections can enter the tray near their device and continue toward a common destination without repeatedly returning to the floor.
Think about a dual-monitor workstation. Both monitors may have power cables and display connections, while the computer also has Ethernet, USB peripherals, audio, and perhaps a docking station.
Without a tray, those cables tend to descend individually behind the desk. The result is a collection of vertical cords rather than one controlled pathway.
With a five-foot basket, cables can enter near each device and follow the same general route underneath the desktop. They leave only when they reach the computer, power connection, or network point.
One defined route simplifies the whole workstation, particularly when the desk is positioned away from a wall where hanging cables remain visible.
The four-inch width does mean you need to be more selective than with the larger Kable Kontrol trays. There is less room for oversized power adapters and large bundles.
That is not necessarily a problem. For a workstation dominated by Ethernet, USB, display, and ordinary power cables, four inches can still provide useful capacity.
It becomes less suitable when you want the tray to hold several bulky power bricks and a large power strip along with every other connection. That is where wider baskets have a practical advantage.
Use the narrow tray for actual cable routing, rather than expecting it to become storage for every adapter underneath the desk.
The open wire design also allows cables to enter and exit almost anywhere along the five-foot section. A monitor cable can leave halfway along while Ethernet continues to the end.
This is useful for shared desks too. Connections for one workstation can branch out at one point while another group continues farther along the tray.
Reusable hook-and-loop ties can be passed around the mesh to keep groups organized. Use them loosely enough that cables are supported rather than compressed.
Do not overtighten network cable bundles, particularly when routing structured Ethernet or fiber optic cabling.
Fiber deserves additional care. Maintain the appropriate bend radius and avoid forcing it sharply around the end of the tray.
The basket gives you room to create a smoother transition. Use that space rather than trying to make every turn as compact as physically possible.
The same principle applies to HDMI, DisplayPort, USB-C, and other thicker cables. Tight bends near connectors can create unnecessary mechanical stress.
Leave connectors with relaxed cable entry, allowing the tray to support the longer cable run before it reaches the device.
For a standing desk, the installation needs additional planning. The tray can move with the desktop, but connections running between the moving desk and fixed wall outlets need enough slack for the complete height range.
Raise the desk fully before securing the final cable bundle. Watch every connection and confirm nothing becomes taut.
Then lower the desk completely. Make sure the extra cable does not drop into the desk frame, chair area, or another moving component.
Test every standing desk position first, because cable management that only works while sitting is not finished correctly.
The basket can hold controlled excess length underneath the desktop. That is much cleaner than leaving large cable loops hanging toward the floor.
Monitor arms require similar testing. Extend the arm fully, rotate the monitor, and adjust its height before deciding how much cable slack is required.
Only then should the remaining length be routed into the tray. This prevents the monitor arm from pulling against a display or power connector later.
Why this Kable Kontrol model finishes sixth in our ranking
The main reason is capacity. This model measures only 4 inches wide, while some of the higher-ranked Kable Kontrol configurations provide substantially more room for larger cable groups and more complicated installations.
The narrow width is both strength and limitation. It makes the tray easier to fit into tight spaces, but it also reduces how much equipment and cable bulk can comfortably sit inside.
For a simple desk, that may be completely fine. Four inches can handle a sensible collection of monitor, computer, Ethernet, and peripheral cables without requiring a huge basket underneath the furniture.
For a workstation with several computers, multiple displays, large adapters, networking equipment, and power distribution, the larger trays provide more breathing room. They also leave more capacity for future expansion.
This model therefore requires slightly better planning. Decide what actually belongs inside before mounting it.
Measure your cable volume before installation, especially if bulky power adapters are part of the setup.
Five feet is also a substantial physical length. Measure the underside of the desk or intended mounting route before ordering around it.
A small writing desk may not have 60 inches of uninterrupted space. Drawers, crossbars, standing-desk motors, control boxes, and monitor-arm clamps can all interrupt the available mounting area.
Temporarily position the tray before drilling or fastening it. Check knee clearance and make sure it does not interfere with moving furniture components.
Plan the mounting position before making holes, particularly with expensive office furniture.
The mounting surface itself matters. Check desktop thickness so mounting hardware cannot penetrate the upper surface.
Some inexpensive desks use hollow-core construction or thin composite panels. Those surfaces may need a different fastening strategy than solid wood.
The tray is made from steel, but the installation is only as secure as whatever supports it. Do not overload weak mounting points.
Strong hardware still needs a strong attachment, especially when the cable count gradually increases over time.
The zinc-plated steel construction gives the tray durability and resistance appropriate for a functional cable-management product. It is suitable for more than cosmetic home-office organization.
The design can be used for network, AV, fiber optic, computer cabling, and similar structured cable routes. That versatility is one of the reasons it still earns a place in our seven-product comparison.
The open mesh also allows air to circulate around the cables. This is useful compared with packing everything into a completely enclosed box.
Open construction keeps cables visible and accessible, making inspection and future changes much easier.
That does mean the wiring is not completely hidden. If total visual concealment is the main goal, an enclosed raceway can produce a cleaner appearance.
The tradeoff is accessibility. Every time a new cable is added to a closed channel, the cover normally needs to be opened again.
This Kable Kontrol tray prioritizes practical access instead. Under a desk or inside an equipment area, that can be the better decision.
Serviceability matters after installation day, especially in technical workspaces where hardware changes regularly.
For Ethernet runs, label both ends before placing several similar cables into the basket. This takes seconds during installation and can save considerable time later.
A label such as "Office PC" or "Access Point" is much more useful than trying to remember which identical blue cable goes where. Use a consistent naming system.
AV installations benefit from the same approach. Label HDMI and other signal cables by source and destination when several devices share the tray.
Good labels make organized cables maintainable, rather than simply making the installation look better.
Another practical rule is to avoid unnecessary cable length. A ten-foot cable used for a three-foot route creates seven feet of excess that needs somewhere to go.
Some service slack is useful, but huge coils quickly consume the limited four-inch basket width. Choose sensible cable lengths when possible.
Do not go too short either. A cable stretched tightly between devices can place constant stress on its connectors.
Controlled slack is the useful middle ground, giving equipment enough movement without filling the tray with unnecessary loops.
For desktop computers, route heavier display and power cables so the tray carries most of their weight. Leave only a relaxed final section leading into the computer.
This helps prevent several thick cables from pulling downward on the rear ports. It also makes unplugging individual connections easier.
For laptop docking stations, the same tray can handle Ethernet, USB, display, and other connections running away from the dock. Keep the dock itself somewhere accessible.
Hide cable length without hiding useful equipment. A clean desk should still be easy to service.
Power adapters need a little more caution because some become warm. Do not bury them underneath a dense pile of wiring.
If an adapter is supported near or inside the cable-management system, preserve airflow and avoid stacking other components directly against it.
The four-inch tray is less suited to storing several large adapters anyway. That limitation can actually encourage a cleaner division between cable routing and power-brick mounting.
Keep heat-producing equipment properly ventilated, regardless of how much physical room remains around the cable tray.
Power and communications cables should also be routed according to the requirements that apply to the installation. In commercial or structured installations, applicable electrical rules and cable separation requirements need to be followed.
Do not assume that because the basket can physically hold every cable together, every cable should be installed together. The tray is part of the infrastructure, not a substitute for proper installation practices.
For a home office, the immediate advantage is much simpler. Get loose cables away from the floor.
Elevated cables are easier to protect from chair wheels, shoes, vacuum cleaners, and robot vacuums.
A robot vacuum catching a USB or charging cable can pull equipment or disconnect something unexpectedly. Keeping the route inside a steel basket removes most of that risk.
The floor also becomes easier to clean. You no longer need to pick up a pile of cords before vacuuming underneath the workstation.
Standing desks look cleaner too. Once the desk rises, the underside becomes much more visible, and loose cable loops become obvious.
A tray keeps the underside more controlled, with only the necessary moving connection descending toward fixed power or network points.
After installation, inspect the setup again after several days of normal use. Cables can settle and move slightly as equipment is adjusted.
Check that nothing has become trapped against a desk frame or pulled tightly around a corner. Make small corrections before the cable jacket or connector begins showing wear.
For long-term maintenance, avoid making every cable tie permanent. Reusable straps are easier when hardware eventually changes.
A good organizer should remain easy to modify, because the workstation probably will not stay identical forever.
This model's sixth-place position therefore comes mainly from its narrower 4-inch capacity and relatively straightforward single-section format. The products above it either provide more cable space, more comprehensive packages, integrated power management, or specialized rack organization.
That does not make the KK-4X2X5 a poor organizer. In the right installation, the smaller width is exactly why you would choose it.
A narrow tray is easier to fit underneath compact desks, along restricted equipment routes, or anywhere a larger 8-inch basket would interfere with furniture or hardware.
The compact width can be a real advantage, provided your cable volume actually fits comfortably inside it.
The five-foot length remains generous, and the 2-inch depth gives the basket enough containment for ordinary cable groups. Zinc-plated steel makes it substantially more durable than lightweight adhesive solutions.
The open mesh makes additions and replacements straightforward. Network, fiber optic, AV, and computer cabling can all benefit from a supported, visible pathway.
We believe the Kable Kontrol KK-4X2X5 deserves the number six ranking out of seven for Best Cable Organizer because it combines a long 5-foot route with a compact 4-inch width, 2-inch depth, zinc-plated steel construction, and accessible wire mesh design.
It ranks below our first five because the narrower basket provides less expansion room and less capacity for bulky workstation setups. Larger Kable Kontrol trays are better suited to dense cable bundles, while some of our other ranked products address power distribution or rack organization more directly.
For a smaller desk, network run, AV installation, or technical workspace where a narrow five-foot pathway is exactly what fits, though, this model remains very practical. Measure the route carefully, mount it securely, use sensible cable lengths, protect bend radius, label important connections, and leave enough service slack for future changes.
Used that way, the KK-4X2X5 provides durable compact cable organization that keeps wiring supported, accessible, off the floor, and much easier to maintain over the life of the installation.

- Self-closing split design installs around existing cable bundles.
- Three-quarter-inch sleeve accommodates grouped cords and wiring harnesses.
- Self-closing split design simplifies installation around existing cables.
- Abrasion-resistant polyester helps protect cables from everyday wear.
- - Flexible construction suits automotive, industrial, and office wiring.
This is more about wrapping and protecting cables than building a fixed route
The Kable Kontrol braided cable sleeve takes the number seven position in our Best Cable Organizer comparison because it solves a different problem from the rigid trays and power-management products higher in the ranking. Instead of mounting a basket underneath a desk, this product wraps around a group of cables and turns several separate cords into one more controlled bundle.
The listing gives you a substantial 100 feet of black sleeving with a 0.75-inch, or 3/4-inch, nominal size. One hundred feet provides serious coverage, so this is not merely a short sleeve intended to clean up the cables behind one monitor.
That quantity makes more sense for larger projects. An installer could cut sections for several workstations, machinery wiring, automotive harnesses, AV equipment, or other areas where multiple cables need to travel together.
The sleeve is made from polyester and uses a self-closing split construction. That split design is important because you do not necessarily have to disconnect every cable and feed it through from one end.
The wrap can go around existing wiring, which makes retrofitting an established setup much less frustrating. Open the sleeve, place the cables inside, and allow the overlapping construction to close around the bundle.
Think about the back of a computer desk containing monitor power, DisplayPort, USB, Ethernet, speaker, and peripheral cables. Those individual cords can be gathered into one sleeve for the section where they all follow the same path.
At the point where a cable needs to leave the group, the split design becomes useful again. One connection can branch toward a monitor or computer while the remaining cables continue together.
This is different from a rigid cable tray. The sleeve moves with the cable bundle, making it useful where wiring needs flexibility rather than a permanently mounted pathway.
That is particularly relevant in automotive and industrial applications. Wiring may need to follow equipment contours, move through confined areas, or remain protected from repeated contact with surrounding surfaces.
The self-closing design makes retrofits much easier
One of the awkward parts of conventional braided sleeving is installation. If the sleeve is a continuous tube, connectors can make it difficult or impossible to slide over an already assembled cable harness.
A self-closing split sleeve avoids much of that issue. You can organize cables without removing every connector, which is useful around equipment that has already been installed and configured.
Imagine an office desk that has gradually become messy over several years. Disconnecting the computer, monitors, docking station, speakers, Ethernet, and USB devices just to install a cable sleeve can turn a small cleanup job into a larger project.
With a split wrap, the cables can remain connected in many situations. You gather the appropriate group, open the sleeve around them, and work along the cable route.
The 3/4-inch nominal size is useful for moderate cable bundles. It can group several ordinary workstation cables while keeping them together as one manageable run.
Do not force too many cables inside, though. An overfilled sleeve becomes difficult to close properly and can create unnecessary pressure on the wiring.
Bundle size changes depending on cable thickness. Three thin USB cables occupy very different space from three heavy power or display cables.
Test a short section before wrapping the entire installation. Make sure the sleeve closes comfortably around the actual cables you intend to organize.
This also gives you a chance to decide which cables should remain together. Not every connection on a workstation necessarily belongs inside the same sleeve.
Group cables according to their actual route. If a monitor cable branches left after 18 inches while the others travel right, plan the sleeve around that point.
Trying to keep everything bundled for maximum distance can create awkward branches and tight bends. Cable management should follow the equipment layout rather than forcing the equipment around the organizer.
The polyester construction provides another benefit: abrasion protection. A cable rubbing repeatedly against the edge of furniture or equipment can eventually wear its outer jacket.
The braided sleeve creates an additional protective layer around the bundle. Abrasion resistance helps protect moving cable groups, particularly in automotive, industrial, machinery, and equipment applications.
This does not mean the sleeve makes poor routing safe. A cable should not repeatedly scrape across a sharp metal edge simply because it has a protective wrap around it.
Fix the route first. Use the sleeve as additional protection and organization rather than a substitute for proper cable placement.
The flexible construction also works around curves more naturally than a rigid raceway. This can be useful behind desks, inside equipment areas, or around vehicle wiring routes where a straight metal tray would be impractical.
Flexible sleeving follows irregular cable paths, which is one of the clearest reasons to choose it over a rigid organizer.
For standing desks, a flexible bundle can help manage the moving section between the desktop and a fixed point. But the sleeve still needs enough length and slack for the full desk movement.
Raise the desk to maximum height after installation. Watch the wrapped bundle and make sure it does not pull against the power, display, USB, or network connectors.
Then lower the desk completely. The sleeve should bend naturally without becoming trapped in the frame or dropping into the chair area.
Always test the full movement range, especially when cable sleeving is used around adjustable furniture or moving machinery.
A monitor arm requires the same treatment. Rotate, extend, raise, and tilt the monitor before deciding exactly where the wrapped section should begin.
If the sleeve reaches too close to a connector, it may make the cable bundle less flexible at the point where movement is actually required. Leave enough individual cable length for the device to move normally.
Why this Kable Kontrol sleeve finishes seventh in our ranking
The biggest reason is that a braided sleeve bundles cables but does not support them in the same way as a mounted tray. If six cables are lying on the floor before installation, wrapping them together still leaves one larger cable bundle on the floor.
The sleeve organizes but does not elevate cables. That is an important distinction when comparing it with the Kable Kontrol wire baskets ranked above it.
A rigid under-desk tray gets cables away from chair wheels, shoes, vacuum cleaners, and floor traffic. This sleeve needs another support method if you want the finished bundle elevated.
You can combine the two approaches. Use the braided sleeve for a section where several cables descend together, then route that wrapped bundle into a tray underneath the desk.
That can create a very clean installation. The sleeve handles the visible transition while the basket supports the longer fixed cable run.
Sleeves and trays solve different problems, and using both can be more effective than expecting either product to do everything.
The second limitation is accessibility. The self-closing design is much better than a sealed tube, but individual cables are still less immediately visible than they are inside an open wire basket.
If one Ethernet cable fails, you may need to open part of the wrap to trace it. With an open tray, the cable can often be followed visually from one end to the other.
This matters more in technical installations that change regularly. Network rooms and equipment benches may prioritize quick access over a tightly bundled appearance.
The sleeve works best for stable cable groups, where several wires normally travel together and individual connections do not need constant changes.
A home theater is a good example. Once the television, receiver, speakers, game console, and streaming devices are installed, the cable layout may remain fairly stable.
A computer lab that changes hardware every month is different. Constantly opening and rebuilding sleeves could become unnecessary work.
The 100-foot quantity is another reason this product is somewhat specialized. That is a lot of sleeving for somebody who only needs to organize the four cables behind one desk.
The large roll suits multi-area projects better, including several workstations, automotive wiring, industrial equipment, AV installations, or a larger office cable-management project.
For one small desk, a shorter quantity could be more practical if available. Buying substantially more material than the project needs creates leftover product that may never be used.
For an installer or business, though, 100 feet becomes a benefit. Cut only the sections required for each job and keep the remainder for the next workstation or piece of equipment.
Cutting braided sleeving deserves some care. Follow the manufacturer's recommended cutting method so the ends remain tidy and the material performs as intended.
Finish cut ends properly where needed, rather than leaving loose fibers that can gradually make the installation look untidy.
The 3/4-inch size also needs to match the cable bundle. Measure or test the actual group instead of assuming a nominal size from the number of cables alone.
Cable thickness varies enormously. USB-C charging cables, heavy power cords, HDMI cables, Ethernet, and thin peripheral leads all occupy different amounts of space.
If the sleeve is too small, it may not close properly. If it is much larger than necessary, the finished bundle can look loose and oversized.
Choose sleeve size around the real bundle, particularly if the installation needs to look clean and remain flexible.
Cable branching needs planning too. If three cables leave the bundle at different points, decide those exit locations before wrapping the full run.
Do not bend one cable sharply backward just because it missed the most convenient opening point. Reopen the sleeve and let the cable exit where its natural route requires.
This is particularly important with network and fiber optic cables. Bend radius still matters after the cables are wrapped.
Cable protection starts with correct routing, not simply covering the bundle with abrasion-resistant material.
For Ethernet, avoid compressing the sleeve excessively around the cable. The goal is organization and protection rather than squeezing the bundle into the smallest possible diameter.
For fiber, use broad curves and avoid pinching. A flexible sleeve can help hold several fibers together, but it should never force them into a tight bend.
Power cords require sensible handling too. Do not create tightly coiled bundles purely to hide excess cable length.
Manage excess length without dense coils, particularly around cables carrying meaningful electrical loads.
Choose appropriate cable lengths when possible. A five-foot cable for a four-foot route is easier to organize than a fifteen-foot cable stuffed into the same area.
Some slack is useful for servicing and movement. Huge amounts of excess length are not.
For automotive applications, the abrasion resistance is particularly relevant. Wiring harnesses can pass near metal structures and areas exposed to vibration.
The sleeve provides an extra layer around those wires. Protection from rubbing is a genuine advantage, provided the cable route itself is properly designed.
Keep the sleeve away from unsuitable heat sources unless the specific product ratings permit the environment. Automotive and industrial installations can experience temperatures far beyond those found behind a computer desk.
Always work within the stated temperature and material specifications. Do not assume all polyester sleeving has identical thermal limits.
The same applies to chemical exposure. Industrial and automotive areas may contain oils, cleaning products, fuels, and other substances that ordinary office cable organizers never encounter.
Match the material to the operating environment, particularly outside ordinary indoor electronics installations.
For office use, the environment is much easier. The main goals are reducing visual clutter, preventing cords from spreading across the floor, and making cable groups easier to handle.
A wrapped bundle behind a sit-stand desk can look considerably cleaner than six separate black cables moving independently. It also becomes easier to guide that group along one controlled path.
The sleeve can be useful between the desktop and an under-desk tray. The visible descending section remains contained while the tray handles the fixed excess cable.
This combination works especially well on standing desks, where part of the cable system moves and part remains fixed.
For entertainment systems, the sleeve can gather HDMI, Ethernet, USB, and other low-voltage connections traveling toward the same equipment cabinet. Branch cables out close to their destination.
For gaming desks, monitor, peripheral, network, and accessory cables can be grouped where their routes overlap. Keep connections that need frequent swapping outside the sleeve where appropriate.
A cable used every day should remain accessible. Hiding a frequently disconnected USB cable inside a long wrapped bundle creates more inconvenience than organization.
Leave frequently changed cables easy to reach, and wrap the stable connections that normally stay installed.
Labeling can still be useful even with a sleeve. Put identification near the cable ends where the individual wires remain visible.
This prevents confusion when several similar connections emerge from the same black bundle. Labels are particularly helpful for multiple monitors or network devices.
The black color can help the sleeve disappear visually against dark desks, equipment racks, or automotive interiors. It creates a more uniform appearance than a collection of cables in different colors and textures.
A uniform bundle can look much cleaner, especially in visible cable runs behind standing desks or entertainment equipment.
Appearance is not enough on its own, though. The bundle should still be easy to service.
Do not wrap cables so tightly or extensively that replacing one connection becomes a major project. Use logical sections rather than automatically covering every inch.
For example, wrap the long common route but leave the final sections near devices open. This provides access to connectors and allows equipment to move.
Use shorter logical sleeve sections when practical, particularly around workstations that receive occasional upgrades.
The self-closing design makes reopening those sections easier. That is one of the strongest advantages compared with traditional closed braided tubing.
You can add a cable later without feeding the entire harness through from one end. Open the relevant section, place the new cable inside, and close the wrap again.
This makes the product more practical for retrofits than a conventional sleeve. It still takes more work than dropping a cable into an open tray, but the finished bundle is more contained.
Self-closing construction balances access and concealment, which is useful when both appearance and future changes matter.
Another practical use is protecting cables where they pass through a busy equipment area. The sleeve can reduce direct rubbing against surrounding surfaces.
Do not let the finished bundle become a tripping hazard. If it crosses a floor, a sleeve alone is not necessarily the appropriate solution.
Floor cable covers or properly routed pathways are designed for pedestrian traffic. This braided wrap is primarily about bundling and protecting the cables themselves.
Use the correct organizer for the location, especially where people or equipment regularly travel across the cable route.
This distinction explains much of the seventh-place ranking. Our higher-ranked products solve broader cable-management problems by supporting, elevating, distributing, or structurally routing cables.
This Kable Kontrol product focuses on bundling and abrasion protection. That is valuable, but more specialized in the context of Best Cable Organizer.
The 100-foot roll also makes it better suited to larger projects than casual single-desk use. Someone organizing one workstation may find a rigid under-desk tray more immediately transformative.
The sleeve becomes stronger as project scale increases, especially when many separate cable bundles need the same type of protection.
Installers can cut sections for several desks or pieces of machinery. Automotive users can protect multiple wiring routes.
Industrial environments can use sections around control wiring and equipment harnesses where the product specifications suit the conditions. AV installers can bundle cables along shared routes.
That versatility keeps the product useful despite its lower overall rank. It simply serves a different part of the cable-management problem.
Seventh place reflects general-purpose usefulness, not a lack of value in the applications this sleeve was designed to handle.
We believe this Kable Kontrol 100-foot braided sleeve deserves the number seven ranking out of seven for Best Cable Organizer because its 3/4-inch self-closing design, flexible polyester construction, long 100-foot quantity, and abrasion-resistant format provide a practical way to bundle and protect wiring.
It ranks below our first six because it does not provide the structural support, elevation, power distribution, or rack organization offered by the higher-ranked products. Cables wrapped inside it still need an appropriate physical route and may require a tray, clips, or other support hardware depending on the installation.
For automotive wiring, industrial equipment, AV systems, standing-desk transitions, or larger projects containing several cable bundles, though, the flexible self-closing format can be extremely useful. Choose the correct sleeve size, avoid overfilling it, preserve proper cable bend radius, provide enough movement slack, and leave frequently accessed connectors exposed.
Used that way, the braided sleeve creates cleaner protected cable bundles while remaining flexible enough for retrofits, equipment changes, and irregular cable routes, giving it a positive and practical role despite its seventh-place position.
Start with the route, not the accessory
A cable organizer works best when it solves a specific route: from the device, along or through the desk, to a reachable power source. Before buying a tray, sleeve, clip, or box, unplug devices where safe and trace each cable with your eyes. Note which ones you disconnect daily, which ones move with a monitor arm or standing desk, and which remain fixed. A neat photograph can hide a connector that becomes impossible to reach after installation. Design for the next laptop swap, not just the first tidy afternoon.
Draw a simple plan with the outlet, power strip, monitor, dock, laptop, lamp, and any network equipment. Mark where the cords drop below the work surface. If most cables run horizontally across the rear, a tray may be the backbone. If they descend one leg, a sleeve or vertical clips may make more sense. If the main problem is a handful of loose charging leads on top, a full under-desk installation could be unnecessary.
Measure the usable underside, not the advertised desk width. Crossbars, drawers, a sit-stand frame, and the chair's knees all compete for the same space. Check how much clearance remains at both seated and raised positions. A product that fits a fixed desk may interfere with a moving frame or stretch its cords when raised.

Choose a format by the problem it solves
Under-desk trays: the main horizontal route
A tray or basket is useful when several power bricks, a strip, and excess cable length need a shared home. Open designs give you a better view of plugs and allow changes without dismantling a cover. Enclosed designs can visually conceal clutter, but make sure you can reach the plug and inspect cords without awkward disassembly. Check the tray's usable interior dimensions, mounting-hole spacing, stated load rating, and the weight of everything you intend to put in it. Do not assume a long tray will fit under a desk with a central support rail.
Mounting method is as important as capacity. Screws require suitable material and safe locations; clamp-on options need an appropriate edge profile and enough clearance. Adhesive claims depend heavily on surface preparation and loading, so a heavy power strip deserves more than a casual stick-on solution. If the tray will hold substantial equipment, follow its manufacturer instructions and the desk manufacturer's restrictions. For more format comparisons, see our under-desk cable management tray guide.
Sleeves and wraps: a flexible vertical run
A sleeve bundles cables that travel together, especially along a desk leg or between a monitor arm and the desk. A split sleeve is easier to retrofit around connected leads; a closed sleeve may look smoother but can require disconnecting everything. Measure the bundle's actual diameter at its thickest point, including plugs only if they must pass through the sleeve. Leave branch exits for devices that separate before the end of the run. A sleeve should not force a sharp bend at a connector or hide an overheated adapter.
For a height-adjustable desk, test the entire movement range before tightening any wrap. The necessary service loop is a functional feature, not untidiness. Our standing-desk cable sleeve guide explores that use case in more detail.
Clips, ties, and mounts: the small branch points
Clips are useful where one or two cables need to follow a desk edge or leg. Match the clip opening to the cable rather than squeezing insulation into a narrow channel. Adhesive mounts should go on a clean, compatible surface; finishes, dust, texture, heat, and humidity can affect adhesion. Removable hook-and-loop ties are convenient for cables you frequently replace, while a permanent tie can make troubleshooting needlessly difficult. Avoid cinching any tie so tightly that it visibly compresses the jacket. See our reusable cable tie guide for more on reconfigurable bundles.

Keep power practical and accessible
Cable management is not permission to overload an outlet or bury a power strip. Read the electrical ratings and instructions for the strip, extension, desk accessory, and connected devices. Avoid daisy-chaining power strips and extension cords. Keep plugs fully seated, cords away from pinch points and sharp edges, and power equipment where the manufacturer permits ventilation and inspection. If a cord or plug is damaged, warm to an unusual degree, or intermittently loses power, disconnect it safely and resolve that issue before concealing the run. For electrical installations or uncertain loads, consult a qualified professional rather than relying on a decorative organizer.
It is often useful to route mains power and low-voltage signal leads in separate channels or at least keep them individually identifiable. This is a practical maintenance and clearance choice, not a guarantee that a particular layout eliminates interference. Keep every connector accessible enough to unplug without pulling on its cable. An organizer should not trap a plug behind a bracket or place a strip where spills are likely. Protect cords from chair casters, foot traffic, and the moving parts of an adjustable desk.
A cable box can obscure a tangle at floor level, but it does not change the electrical rating of the enclosed equipment. Follow the strip and box manufacturers' ventilation and placement directions; do not assume any enclosed box is suitable for every power brick. A tray that leaves outlets visible can be preferable if you swap devices frequently. The tidiest-looking solution is not necessarily the one you can service safely.
Leave enough slack, but not a floor loop
At the desk's normal positions, a cable should reach its socket without tension. At full standing height, it should still have an easy curve rather than pulling against the plug. At seated height, collect excess length so it does not dangle into knees, wheels, or a vacuum path. Secure the loop at a stable point, without coiling cables tightly around a hot adapter or winding a power cord into a compact heat-trapping bundle. Check both extremes and the midpoint while someone watches the cables; stop the desk if anything snags.
Measure and install in a sequence you can reverse
First, photograph the existing setup and label both ends of any cable that could be confused with another. This takes less time than tracing a mystery lead six months later. Remove obsolete leads before choosing a tray size. Group fixed power leads, frequently detached charging leads, and data cables by destination, but do not bundle merely because they cross at one point. A separate short path to a dock can be more serviceable than a single fat sleeve containing everything.
Second, mock up the route with painter's tape or temporary ties. Sit at the desk, move the chair, open drawers, articulate the monitor arm, and raise the desk if it moves. Mark a reachable location for the strip's switch and all plugs. Confirm the underside is structurally suitable before drilling or clamping; look for concealed components and follow the desk maker's guidance. For a rental, a reversible clip-on arrangement may be preferable to drilling, but check that clamps do not damage the finish or obstruct a drawer.
Third, mount the primary channel and feed the longest, least frequently changed runs first. Do not fill a tray to the brim: spare room lets you identify and replace a lead. Add ties at intervals that support the bundle without making it rigid. At each branch, leave enough slack to disconnect the device and enough clearance to avoid a tight turn. Use clips to control the last stretch to each socket, not to pull a cable taut against its plug.
Finally, reconnect one device at a time and test its intended function. Check each outlet, data connection, charging path, and monitor signal. Move adjustable parts through their full travel again with the equipment powered as appropriate. If a connection fails, the labels and accessible branch points should let you troubleshoot without tearing down the whole installation. The procedure is more useful than achieving perfectly parallel lines at any cost.

What to check before buying
| Question | Why it matters | Check at home |
|---|---|---|
| Where is the main run? | Horizontal and vertical routes call for different organizers. | Trace every cord from device to outlet. |
| What can be mounted? | Desk material, frame and drawers limit the location. | Measure clear underside and edge profile. |
| What moves? | Monitor arms and standing desks need service loops. | Test all travel positions before fastening. |
| What changes often? | Access determines whether a tray or reusable tie is convenient. | List devices you unplug each week. |
Compare those answers to the organizer's dimensions, mounting instructions, material compatibility, capacity, and return terms. Photos alone rarely show the bracket's clearance or the real path of a plug. If a standing desk or built-in routing is part of a larger furniture decision, our desk cable management guide offers another starting point. An inexpensive set of ties can be enough for a simple workstation; a complex station may need a tray, sleeve, and a few clips working together. They are complementary tools rather than a single universal winner.
Keep the setup maintainable
Once installed, revisit the route whenever a device is added or removed. Do not leave an abandoned power lead buried in a sleeve because extracting it is inconvenient. Check adhesive mounts for movement, clamps for stability, cable jackets for abrasion, and the clearances around plugs and moving parts. Replace a failing organizer or damaged cable rather than adding another layer of tape to hide it. A quick periodic visual inspection is easier when the tray is not packed solid and labels remain legible.
Make the daily-use cables easy to reach. A laptop charging lead should not require crawling under the desk, while a fixed monitor power lead may be fine in a rear tray. Keep a small reserve of reusable ties for the next equipment change. If two people share the desk, agree on which outlets and cables should remain accessible. The best organization system is one that still makes sense to someone who did not install it.
Use the ranked products above as examples of different formats and scales, then verify the current listing's dimensions and installation requirements against your desk. The right purchase depends on route, surface, access, movement, and load—not merely on a tidy-looking before-and-after image. Prioritize safe power placement and serviceable connections, and let visual neatness follow those decisions.
Cable organizer FAQs
Is a tray or sleeve better for a desk?
Use a tray for a shared horizontal run and a sleeve for a bundle that follows a leg or moving path. Many desks benefit from both, with clips at the branch points.
Can I attach a cable organizer without drilling?
Some organizers use clamps or adhesive mounts, but compatibility depends on the desk edge, surface finish, weight, and manufacturer instructions. Check clearance and load before relying on either method.
How much slack should I leave on a standing desk?
Leave enough for every cable to reach without tension at the highest position, then control excess at seated height so it cannot snag. Test the entire movement range before fastening the route.
Should power and data cables share one sleeve?
Keep routes identifiable and follow the instructions for each cable and power accessory. Separate channels can simplify maintenance and clearance; a sleeve does not make an overloaded or damaged power setup safe.
Can a cable box hold any power strip?
No. Check the dimensions, ventilation and placement instructions of both the box and the strip. Keep plugs accessible and do not treat a box as permission to exceed electrical ratings.
How often should I check a finished cable setup?
Inspect it when equipment changes and periodically for loose mounts, pinched or abraded jackets, inaccessible plugs, and movement-related snags. Replace damaged components instead of concealing them.