


- 17-inch cutting width accommodates large A3 paper and craft projects.
- Heavy-duty stack design cuts hundreds of standard paper sheets.
- Manual clamping system helps prevent paper stacks shifting during cuts.
- Metal construction provides a stable base for repeated trimming work.
- Precision guide system helps create consistent repeated paper dimensions.

This is far more substantial than the little craft trimmer most people start with
The INTBUYING 17-Inch A3 Manual Paper Cutter takes the number one position in our best paper cutter for crafting comparison because it is built for jobs that ordinary lightweight craft trimmers struggle with. This is a heavy-duty stack guillotine with a 17-inch cutting width, giving it enough working space for A3 sheets and smaller paper formats.
The big difference is cutting capacity. Comparable 17-inch A3 stack cutters in this design class are built to process hundreds of standard paper sheets in a single operation, rather than the handful of sheets normally associated with small rotary and sliding craft cutters.
That changes what you can realistically make with it. Large stacks can be trimmed together, which is useful when preparing handmade notebooks, invitations, card blanks, planner inserts, photo projects, bookbinding materials, and repeated paper components that all need the same finished dimensions.
Instead of measuring and cutting twenty identical sheets individually, you can align a stack, clamp it securely, and perform one controlled cut. For batch crafting, that saves a considerable amount of repetitive work.
The clamp is just as important as the 17-inch blade
A sharp blade alone does not guarantee an accurate stack cut. If the upper sheets move while the blade travels through the stack, the finished edges can gradually shift from top to bottom.
That is why the clamping system matters. Firm clamping helps keep sheets aligned while the guillotine blade passes through the material.
Imagine making 100 pages for several handmade journals. If every batch is trimmed slightly differently, those small errors become obvious once the pages are stacked and bound together.
A heavy-duty cutter is useful because the material can be positioned against the guide, measured, clamped, and then cut as a stack. The process is much more repeatable than holding a thick pile by hand against a lightweight desktop trimmer.
The 17-inch cutting width is particularly useful for crafting because A3 material can be processed before being reduced into smaller components. You might begin with a larger sheet and divide it into covers, inserts, cards, or other project pieces.
A3 capacity gives projects more flexibility, even if most of the finished pieces are eventually much smaller. It is easier to cut a large starting sheet down accurately than discover that the cutter cannot physically accommodate the material in the first place.
The substantial metal base also matters. Heavy-duty guillotines rely on a stable working platform because cutting a thick stack generates much more force than trimming a single photograph.
Place the machine on a strong, level workbench or table. Do not position a heavy stack cutter on a lightweight folding table simply because there happens to be enough surface area.
The cutting surface should remain stable while the handle is operated. A solid work surface improves cutting control and prevents the complete machine from shifting while pressure is applied.
Before processing an important craft project, make a test cut with scrap material of the same type. This is particularly useful when switching between standard copy paper, heavier cardstock, coated paper, or another material.
Paper thickness changes the number of sheets that can reasonably be cut at once. A capacity figure based on ordinary 70gsm or 80gsm paper should not be interpreted as the same sheet count for thick cardstock.
For example, 100 sheets of heavy craft card create a dramatically thicker stack than 100 sheets of ordinary office paper. Material thickness matters more than sheet count alone, so reduce the stack when using heavier stock.
Do not force the handle when the material feels beyond the machine's comfortable cutting range. A smaller clean batch is more useful than a larger stack that shifts, tears, or produces an uneven edge.
Alignment also needs attention before the clamp is tightened. Tap the paper stack against a flat surface so the edges are square, then position it carefully against the cutter's guide.
Once clamped, check the measurement again. Moving the paper after the clamp is tightened defeats the purpose of creating a stable cutting setup.
Measure first and clamp second, then keep hands completely clear of the blade path before operating the handle. With repeated craft pieces, make one sample first and compare it against the required dimensions before cutting the remaining stack.
Why we believe this INTBUYING deserves the number one position
Precision becomes especially important when making repeated components. Greeting cards, wedding invitations, notebook pages, inserts, menus, presentation pieces, and paper crafts often need several pieces to finish at exactly the same dimensions.
A difference of only a few millimeters can become visible once twenty pieces are stacked together. That is why a guide and clamping system are more useful than simply having a large blade.
The cutter can also be valuable for bookbinding preparation. Clean stack edges make binding look better, especially when pages need to line up before coil binding, comb binding, stitching, or another finishing process.
For example, somebody making ten handmade notebooks may print the interior pages first, stack them into batches, and then trim each batch to its final dimensions. A high-capacity cutter can turn what would otherwise be a long sequence of individual cuts into a much more manageable process.
Photo and printed craft projects can benefit too, although coated and photographic materials should always be tested first. Different coatings and thicknesses can behave differently under a guillotine blade.
Never assume that because the machine cuts a thick stack of standard paper, it will handle the same number of sheets of every other material. Reduce the batch until you know how the material behaves.
Test cuts prevent expensive material waste. A single scrap test can reveal whether the blade produces the edge quality you want before a finished print or decorated sheet is placed underneath it.
The same rule applies when precision matters around printed borders. If the artwork needs an exact margin, cut a spare print first and verify the guide position before processing the full batch.
Blade condition matters over time. A sharp guillotine should produce a clean edge without excessive tearing, feathering, or crushing.
If cut quality gradually becomes worse, inspect the blade and cutting system according to the manufacturer's maintenance instructions. Heavy-duty stack cutters use replaceable or serviceable cutting components because edges naturally wear after repeated use.
A sharp blade produces cleaner craft edges and requires less unnecessary force than a neglected cutting edge. Do not attempt casual blade servicing without following the proper procedure, because a 17-inch guillotine blade is a serious cutting component.
Safety is more important here than with a small enclosed sliding trimmer. Keep fingers and loose objects completely outside the cutting path and use every supplied guard, lock, clamp, and safety feature exactly as intended.
Never reach underneath or near the blade to retrieve a small offcut while the cutter is ready for operation. Remove scraps only when the blade and handle are in the safe position specified by the manufacturer.
Children should not operate or have unsupervised access to a heavy-duty guillotine. This is professional-style cutting equipment, and its high stack capacity comes from a large sharp blade and substantial mechanical leverage.
When the machine is not being used, engage the appropriate blade or handle safety mechanism if supplied. Store it somewhere that prevents accidental access to the cutting edge.
The cutter's size and weight are worth considering too. This is not the type of craft trimmer most people casually slide into a desk drawer after making one card.
It makes more sense as a semi-permanent piece of equipment on a craft bench, print station, studio table, or bookbinding workspace. The heavy construction trades portability for stability, and for batch cutting that is generally a sensible trade.
That distinction is important when deciding whether this is actually the right type of paper cutter for you. If you only trim one photograph or two sheets of scrapbook paper every few weeks, a compact rotary cutter may be easier to store and faster to set up.
If you regularly prepare dozens or hundreds of repeated paper pieces, the INTBUYING becomes much more interesting. Batch capacity starts saving real time once the work moves beyond occasional single-sheet trimming.
It can also reduce inconsistencies between repeated pieces. Cutting several sheets in one properly aligned stack means those sheets share the same cut line rather than relying on the user to reproduce the measurement individually every time.
Batch cutting improves repeatability for crafting, which is one of the strongest reasons this model earns our top ranking. Repeated dimensions matter when the final pieces will eventually be stacked, folded, bound, or displayed beside one another.
There are some practical downsides. The machine occupies considerably more space than a lightweight craft trimmer, it requires more care around the exposed cutting mechanism, and its heavy-duty design is unnecessary for very small projects.
Those limitations are real, but they come directly from the same construction that gives the cutter its high capacity. A machine designed to cut thick stacks cannot realistically be as small and casual as a plastic single-sheet trimmer.
For our ranking, the ability to handle large A3 material and thick stacks outweighed those drawbacks. The 17-inch format gives serious project capacity without moving into a powered commercial cutting machine.
It also remains manually operated, which means there is no motor or electrical cutting cycle required for basic operation. The user controls the cut through the lever mechanism after the material has been positioned and clamped.
That manual process can be useful in a craft studio because setup remains straightforward. Measure, align, clamp, verify, cut, then inspect the finished stack before moving on to the next batch.
So why do we believe the INTBUYING 17-Inch A3 Manual Paper Cutter deserves the number one ranking out of seven? It combines large-format A3 capability, heavy-duty stack cutting, a substantial base, paper clamping, measurement guidance, and the mechanical leverage needed for serious batch preparation.
For crafters producing notebooks, cards, invitations, printed inserts, bookbinding projects, paper decorations, or repeated components, those features solve problems that lightweight trimmers simply are not designed to handle. The ability to process an aligned stack can save time while producing more consistent finished dimensions.
Use smaller batches when working with thick cardstock, make test cuts before trimming expensive prints, keep the blade properly maintained, and treat the cutting area with the respect a heavy guillotine requires. For high-volume paper crafting and larger-format projects, this INTBUYING provides exceptional cutting capability, which is why we placed it first in our seven-product comparison.

- 15.75-inch cutting width accommodates large A3 crafting materials.
- Ten-sheet capacity speeds up repeated paper trimming projects.
- Manganese steel blade is designed for cleaner finished edges.
- Heavy steel base provides excellent stability during manual cutting.
- Alignment grid and clamp help improve repeated cutting accuracy.
This is much easier to live with than a commercial stack cutter
This 15-inch Heavy-Duty Guillotine Paper Cutter takes the number two position in our best paper cutter for crafting comparison because it sits in a useful middle ground. It is substantially more capable than a lightweight plastic craft trimmer, but it does not have the enormous stack capacity and bulk of the INTBUYING machine in our number one position.
The cutting width is approximately 15.75 inches, which gives you enough room to work with A3 material and plenty of smaller craft formats. That extra width matters for scrapbook paper, printed artwork, cardstock, photographs, handmade invitations, planner pages, and larger sheets that will eventually be divided into smaller pieces.
The rated capacity is around 10 sheets per cut, depending on paper thickness. Ten-sheet cutting speeds up repetitive projects without turning this into the kind of industrial stack cutter that needs a permanent production-table setup.
For many crafters, ten sheets is actually a sensible amount. You can trim several identical pages together while still being able to check alignment carefully before every cut.
The steel base and clamp are doing more work than you might initially notice
A guillotine cutter needs a stable foundation because the cutting arm applies force downward and across the material. If the base moves while the blade is travelling, accuracy suffers even if the blade itself is sharp.
This model uses a substantial steel base, with matching product specifications indicating a weight around 20 pounds. The heavy base helps keep cuts stable, especially when working with larger sheets where a lightweight plastic cutter can move around more easily.
That weight does make the cutter less convenient to carry between rooms. But for a dedicated craft desk, print station, classroom, or home studio, stability is usually more valuable than portability.
Non-slip support underneath the base adds another layer of stability. Put the cutter on a level, sturdy table and make sure the feet are making proper contact before starting a batch.
The alignment system is important too. Grid markings give you reference points when positioning paper, while the clamp helps prevent the sheet or small stack from moving after the measurement has been set.
Accurate alignment matters for repeated craft pieces. If you are producing twenty invitations that should all measure exactly the same, a few millimeters of variation becomes surprisingly obvious once they are stacked together.
A good workflow is simple. Square the sheets first, place them against the guide, check the measurement, secure the material, and only then make the cut.
Do not try to reposition the stack after it has been clamped. Release it, realign everything, verify the measurement again, then secure it properly.
The manganese steel blade is another notable part of the design. Matching specifications for this cutter describe a curved manganese steel cutting edge intended to reduce rough burrs and produce cleaner edges.
That is particularly useful with visible craft work. Clean edges matter on finished projects, because fuzzy or slightly torn cuts are much more noticeable on invitations, photographs, cards, presentation pieces, and scrapbook elements than they are on ordinary office paperwork.
Blade condition still matters over time. Even a strong steel cutting edge gradually wears after enough repeated use, particularly when heavier materials are processed regularly.
If cut quality starts changing, inspect and maintain the cutting system according to the manufacturer's instructions. Do not compensate for a deteriorating edge by simply forcing the handle harder.
The 10-sheet capacity also needs to be interpreted correctly. Sheet counts are normally based around relatively light paper, so ten sheets of heavy cardstock are not equivalent to ten sheets of ordinary printer paper.
Thicker stock requires smaller cutting batches. If the stack feels unusually resistant or starts shifting, reduce the number of sheets rather than trying to overpower the cutter.
This is particularly important for crafting because materials vary so much. Photo paper, laminated sheets, card, labels, decorative paper, and standard copy paper all behave differently under a guillotine blade.
Make one test cut before processing expensive materials. A thirty-second test with an offcut is preferable to discovering that the selected material tears or marks after you have already placed a finished print under the blade.
Why this cutter earns second place instead of taking our top position
The 15.75-inch working width is one of the biggest reasons this product ranks highly. Smaller 12-inch cutters can be perfectly adequate for A4 paper, but larger craft sheets become more awkward once the required cut exceeds the available blade length.
A3 compatibility gives you considerably more flexibility. Larger sheets can be reduced in stages, which is useful when producing cards, planner inserts, book pages, photograph borders, or other components from a larger starting sheet.
Imagine printing a series of artwork sheets that contain several cards on each page. Instead of trimming every card individually with scissors, you can establish the first straight cut using the guide and then continue reducing the material to its final dimensions.
The alignment grid becomes useful because the same measurement can be repeated across multiple sheets. That is where a proper guillotine begins saving real time in craft production.
For scrapbook work, straight edges are particularly important when several layers need to line up. A slightly crooked background sheet becomes more noticeable after another rectangular layer is positioned on top.
Repeatable straight cuts improve layered projects, especially when borders are supposed to remain equal around photographs or printed designs.
The same principle applies to handmade cards. If the front decorative panel is supposed to sit inside the card with a consistent border, accurate trimming makes final assembly considerably easier.
Photographs can also be trimmed, but test the surface first. Glossy and coated papers behave differently from ordinary uncoated sheets, and the cutting capacity should be reduced accordingly.
The cutter can also be useful when preparing materials for binding. Planner pages, booklets, manuals, teaching resources, and handmade notebooks all look cleaner when the page dimensions remain consistent before binding begins.
Consistent page sizes improve finished binding. If several pages extend beyond the others, those errors become obvious once the finished document is closed and viewed from the edge.
Safety deserves particular attention because this is an exposed guillotine-style cutting system rather than an enclosed sliding blade. Keep hands completely outside the blade path and use the supplied clamp, guards, locks, and safety mechanisms exactly as instructed.
Never hold a small offcut near the cutting line with your fingers. If the material is too small to secure safely using the cutter's intended system, use a more appropriate cutting tool for that particular piece.
Keep the blade secured when the cutter is not being used. A guillotine blade requires deliberate handling, especially in homes, classrooms, or shared craft spaces where another person could approach the machine without realizing it is ready to cut.
This type of cutter should also be stored away from unsupervised children. Its mechanical simplicity does not make it a casual toy or children's craft tool.
The main reason this product does not take our number one position is capacity. Our top-ranked INTBUYING 17-inch cutter is designed as a much heavier stack-cutting machine, making it better suited to high-volume projects where very thick batches need to be processed together.
This second-ranked cutter is limited to roughly 10 standard sheets per pass. If you need to trim hundreds of pages for handmade notebooks or bookbinding production, that difference becomes significant.
But there is another side to that limitation. A smaller capacity makes the machine more manageable for normal crafting, where enormous paper stacks may be unnecessary.
You still get a wide A3-capable cutting area, substantial steel base, alignment grid, paper holding system, and a strong guillotine blade. For cards, scrapbooking, classroom projects, photo trimming, printed crafts, and smaller binding jobs, that combination can be easier to work with than a commercial-style stack cutter.
The heavy base is still something to plan around. At around 20 pounds for matching versions of this design, it is better suited to a stable craft table than being moved in and out of a cupboard for every single cut.
Give it a permanent or semi-permanent location if possible. Leave enough clearance for the handle to travel through its complete operating range without contacting shelves, walls, or other equipment.
Clear working space improves safe operation. Paper stacks, scissors, rulers, and craft supplies should not be sitting inside the handle or blade movement area while a cut is being made.
Measure twice when working with finished artwork. The cutter can produce a straight edge, but it cannot correct a measurement mistake after the blade has passed through the print.
For repeated pieces, make one finished sample and physically compare it with the required dimensions. Once that sample is correct, use it to verify subsequent batches before cutting all remaining material.
This reduces expensive mistakes when making invitations, photographs, cards, or printed merchandise. The more valuable the paper, the more worthwhile a test cut becomes.
That is why we believe this Heavy-Duty 15-Inch Guillotine Paper Cutter deserves the number two ranking out of seven. Its 15.75-inch A3-capable cutting width, 10-sheet capacity, substantial steel base, alignment system, clamp, and manganese steel blade provide a strong balance between craft versatility and heavy-duty construction.
It misses first place because the INTBUYING offers considerably greater stack-cutting capability for serious batch production. For many home crafters, though, this model may actually be easier to accommodate while still offering far more stability and cutting width than a lightweight craft trimmer.
Use smaller batches for thick cardstock, test coated materials before cutting finished pieces, keep the work area clear, and secure the blade whenever the cutter is not in use. For regular card making, scrapbooking, photography, paper crafts, and medium-volume trimming, this cutter provides an excellent balance of precision and capacity.

- Heavy-duty construction supports demanding paper and crafting projects.
- High-capacity cutting design handles thicker stacks more efficiently.
- Protective safety guard helps separate hands from cutting area.
- Adjustable paper guide improves consistency across repeated craft cuts.
- Stable commercial-style base supports controlled manual guillotine operation.
This is built for crafters who are already cutting more than a few sheets at a time
This Industrial Heavy-Duty Paper Cutter takes the number three position in our best paper cutter for crafting comparison because it moves well beyond the small plastic trimmers normally associated with occasional card making. Its heavy-duty guillotine construction is designed for thicker paper stacks and repeated cutting, while the protective system makes more sense for a machine operating with a substantial blade.
That combination becomes useful when crafting starts turning into batch work. Handmade invitations, planner inserts, notebook pages, card blanks, printed artwork, classroom materials, and small commercial craft orders can involve dozens or hundreds of pieces that need matching dimensions.
Cutting those pieces individually takes time and creates more opportunities for measurement differences. Stack cutting makes repeated dimensions easier, provided the sheets are aligned and secured correctly before the blade comes down.
This is also the kind of cutter that makes more sense on a dedicated craft bench than stored in a drawer. The heavier construction trades portability for stability, which is generally a useful exchange once thicker stacks enter the workflow.
The protective guard matters when the cutter has this much mechanical leverage
A heavy-duty guillotine is fundamentally different from an enclosed sliding paper trimmer. The long handle gives the user mechanical leverage, allowing a substantial blade to pass through multiple sheets with one controlled movement.
That cutting ability means safety features matter. The protective guard deserves to stay installed and should never be removed simply because it makes an unusual cut slightly less convenient.
Keep hands completely outside the cutting path. Use the supplied guides, clamp, guard, and other positioning components rather than trying to hold small pieces close to the blade with your fingers.
If a craft component is too small to secure properly, use another cutting method. A craft knife, enclosed rotary trimmer, or precision cutter may be more appropriate for tiny pieces than a high-capacity guillotine.
This model is much better suited to straight batch cuts. Imagine printing several sheets of invitations with multiple designs arranged on each page.
You can establish the first cut line, align the stack, secure the paper, and cut several matching sheets at once. One aligned cut reduces repeated measuring, which becomes valuable when every finished invitation needs the same border width.
The same principle applies to handmade notebooks. Interior pages can be stacked and trimmed before binding so their outer edges line up more consistently.
If every page is cut individually, a tiny measurement difference on each sheet can create a visibly uneven edge once the pages are assembled. Cutting aligned batches helps reduce that variation.
Paper guides are important for this reason. The guide establishes a repeatable reference point rather than relying on the user to visually estimate each cut.
Repeatable guides improve batch consistency, particularly for card blanks, photographs, scrapbook layers, notebook pages, labels, and printed inserts that need matching dimensions.
Still, measure the first finished piece before cutting the complete batch. A guide can repeat a position accurately, but it will also repeat an incorrect position accurately if the initial measurement was wrong.
Make one test piece. Compare it with the required dimensions, check the printed margins, then continue once you know the setup is correct.
This becomes especially important when working with expensive paper. Specialty cardstock, photographic media, textured craft stock, and professionally printed sheets can cost considerably more than ordinary copy paper.
A test cut protects expensive materials. Using one scrap or spare print first is much cheaper than discovering a measurement error after cutting an entire stack.
Material thickness needs to be considered as well. A cutter's sheet capacity is normally based on a particular standard paper thickness and should not be applied blindly to every craft material.
Ten sheets of thick cardstock can create a much larger stack than ten sheets of ordinary printer paper. Laminated material, coated paper, photographs, and specialty card can also require different cutting pressure.
Reduce the batch when moving to thicker stock. Do not force the handle simply because the machine handled a larger stack of lightweight paper previously.
Smaller batches are better than damaged edges. Excessive stack thickness can cause shifting, rough cuts, or unnecessary stress on the blade and cutting mechanism.
Why this industrial cutter lands in third place instead of our top two
The commercial-style construction gives this cutter an advantage over lightweight craft trimmers when repeated work is involved. A stable base is important because the machine needs to remain stationary while downward pressure is applied through the handle.
Place it on a strong, level table or workbench. A lightweight folding table may have enough physical surface area but still flex or move during operation.
A stable table improves cutting control, especially when working with wider sheets or thicker stacks. The cutter itself should not slide while the blade is moving through the material.
Give the handle enough clearance too. Shelving, walls, storage containers, and other craft equipment should remain outside the full movement range of the lever.
This sounds basic, but craft rooms tend to accumulate equipment quickly. A guillotine placed underneath a shelf can become awkward if the handle cannot rise through its intended range.
Keep scraps away from the mechanism as well. Thin paper strips can accumulate around the cutting area after a long batch session.
Clear scraps only from a safe position, with the cutting mechanism secured according to the manufacturer's instructions. Never reach toward the blade while the handle is positioned for another cut.
Blade condition has a direct effect on finished craft quality. A sharp cutting edge should create a cleaner result than a worn blade that begins crushing or tearing the edge of the paper.
If cuts gradually become rougher, inspect the machine according to the manufacturer's maintenance guidance. Do not compensate by applying increasingly aggressive force to the handle.
This matters particularly with visible finished pieces. A rough edge may be irrelevant on internal office paperwork but immediately noticeable on a wedding invitation or photograph.
Clean edges improve finished craft presentation, especially when multiple layers are aligned closely together. Scrapbook borders, card fronts, and photo mounts make small cutting imperfections much easier to see.
For layered projects, cut the largest background component first and verify its dimensions. Then reduce the smaller layers using measurements that preserve the intended border around each piece.
The cutter can also be useful for classroom craft preparation. A teacher preparing identical sheets for a group activity can process repeated straight cuts more efficiently than trimming every sheet separately.
The same applies to small craft businesses. Once orders require twenty, fifty, or a hundred matching paper pieces, cutting efficiency becomes part of the production process rather than a minor preparation step.
Batch capability becomes valuable at higher volumes. It reduces repetitive measuring and can make finished dimensions more consistent across an order.
That does not mean every crafting job belongs on a guillotine. Detailed curves, tiny decorative pieces, intricate shapes, and internal cutouts still require other tools.
A heavy-duty paper cutter is primarily a straight-cutting machine. It works best for reducing larger sheets, squaring edges, trimming stacks, and creating repeated rectangular components.
This is why many serious craft spaces benefit from more than one cutting tool. The guillotine handles fast straight cuts, while scissors, rotary cutters, craft knives, or electronic cutting machines handle shapes and detailed work.
Use the right cutter for each task rather than trying to make one machine handle every type of crafting operation.
Storage needs consideration because industrial-style cutters are larger and heavier than basic craft trimmers. Moving one off a high shelf every time you need three cuts can become inconvenient.
A permanent or semi-permanent position works better. If the machine is used regularly, keeping it on a sturdy workbench means it is ready for batch trimming without repeated setup.
When it is not being used, secure the cutting mechanism using the manufacturer's safety system. Keep the machine inaccessible to unsupervised children.
A heavy guillotine requires careful storage because the blade and lever mechanism remain serious cutting equipment even when the craft project is finished.
So why does this product rank third rather than first? Our number one INTBUYING 17-inch A3 cutter provides a particularly strong combination of large-format cutting and substantial stack capability for serious batch work.
The second-ranked heavy-duty 15-inch cutter offers a very useful balance between a wide A3-capable cutting area, manageable 10-sheet capacity, strong steel base, and everyday crafting practicality.
This industrial model remains highly capable, but it sits between those two approaches. Its heavy construction and protective features make it suitable for demanding use, yet it may be more machine than an occasional home crafter actually needs.
Heavy construction reduces everyday portability, and that matters if the cutter has to be packed away after every project. Smaller trimmers are easier to store even though they cannot compete with this machine's batch-cutting ability.
For someone regularly producing repeated craft pieces, though, the tradeoff makes sense. Stability, capacity, and consistent straight cuts become more important than being able to slide the cutter into a desk drawer.
The safety guard also gives this model a practical advantage in a serious workspace. It reinforces the fact that the blade area needs to remain controlled during every cut.
That is why we believe this Industrial Heavy-Duty Paper Cutter deserves the number three ranking out of seven. It offers strong batch-cutting capability, commercial-style construction, a protective guard, paper alignment features, and the stability needed for repeated craft production.
It misses the top two because those products provide slightly stronger combinations of large-format capacity and overall crafting convenience. But for a dedicated craft room, classroom preparation area, print workspace, or small handmade-products business, this model still has plenty to offer.
Test new materials before processing a complete batch, reduce the stack for thicker cardstock, keep the cutting area clear, and use every supplied safety component exactly as intended. For crafters moving from occasional trimming into repeated production, this cutter provides serious straight-cutting capability while maintaining the control needed for precise paper projects.
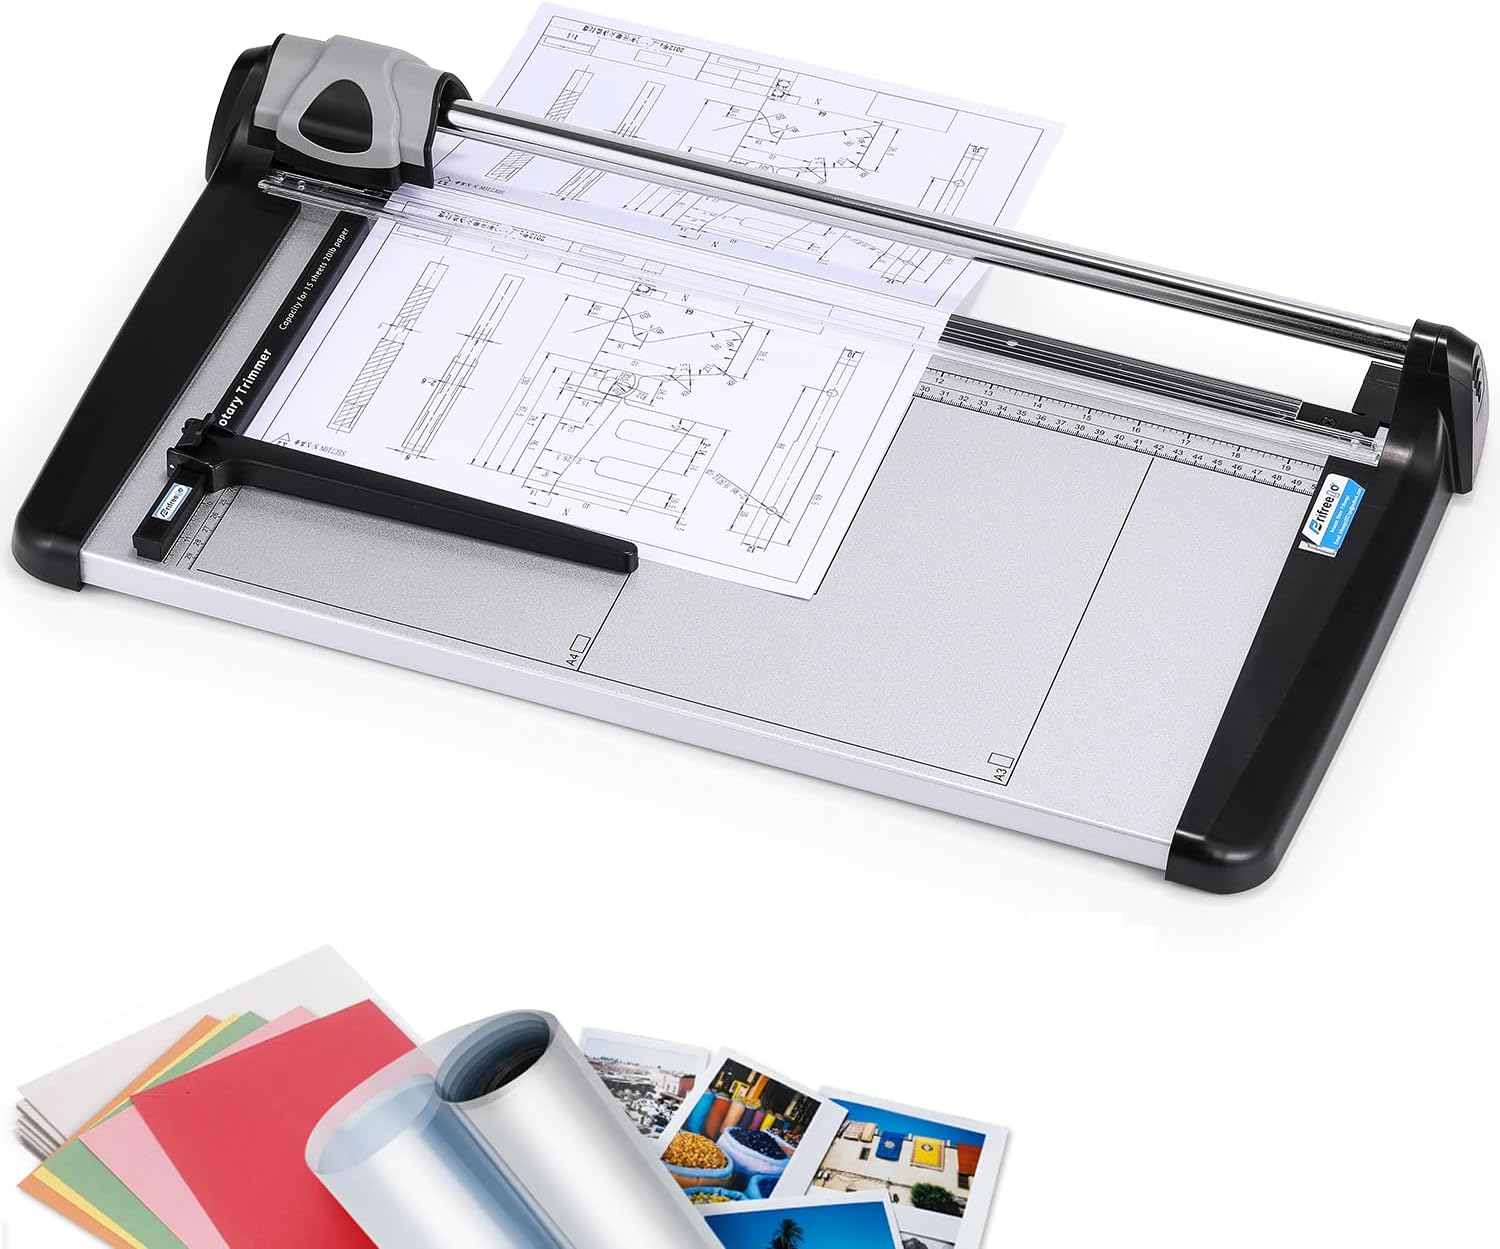
- Rotary cutting system provides controlled straight cuts for crafting.
- Sliding blade design keeps the cutting edge more contained.
- Measurement guides help produce consistent repeated paper dimensions.
- Wide cutting surface accommodates common paper and craft materials.
- Compact construction is easier to store than guillotine cutters.
This is where the list shifts from heavy guillotines to everyday craft cutting
The Frifreego Rotary Paper Trimmer takes the number four position in our best paper cutter for crafting comparison because it approaches paper cutting very differently from the three heavy-duty guillotines above it. Instead of bringing a long exposed blade down through a thick stack, this design uses a rotary cutting mechanism that travels along a guided cutting path.
For many home crafters, that is actually a more convenient format. You lose the extreme stack-cutting ability of a commercial guillotine, but gain a cutter that is easier to control for photographs, cardstock, scrapbook paper, printed designs, labels, and other everyday craft materials.
The rotary mechanism is the main reason. The blade follows a controlled cutting path, which can make precise single-sheet and small-batch trimming feel more predictable than operating a large lever-style cutter.
It also makes more sense when the project involves frequent small adjustments. If you are trimming ten different photographs to ten different dimensions, enormous stack capacity does not provide much benefit because each piece needs its own measurement anyway.
The rotary blade makes more sense when precision matters more than stack capacity
A rotary trimmer works best when the material is positioned carefully against the measurement guides before the cutting head is moved across it. The guided motion helps establish a straight cutting line without requiring the user to control a freehand blade.
This is particularly useful for card making. Straight repeatable cuts improve card assembly, especially when a printed or decorative panel needs an even border after it is attached to the card base.
Imagine making twenty birthday invitations with a photograph on the front. Each photograph needs to be trimmed to the same dimensions before being attached to the cardstock underneath.
A rotary cutter lets you establish the measurement, align each photograph, and make a controlled straight cut. You are not trying to process a massive stack because the printed images may need to be checked individually anyway.
Scrapbooking is another obvious use. Decorative paper often needs to be reduced into rectangles, borders, photo mats, and layered sections with fairly precise dimensions.
Measurement guides reduce repeated guesswork. Instead of measuring every piece with a separate ruler and marking it with a pencil, the cutter's working surface can provide reference points for common dimensions.
Still, verify the guide before starting an expensive project. Printed scales are useful, but a test piece gives you confidence that the material is positioned exactly where you expect relative to the cutting line.
Cut one scrap first. Measure the finished result with a ruler, then continue once the dimension is correct.
This matters when making repeated layers. A difference of only a few millimeters can become obvious when one rectangle is centered on top of another.
A test cut prevents repeated measurement errors, particularly when you plan to process twenty or thirty pieces using the same guide position.
Photographs are another area where the rotary design can be convenient. A sliding cutter provides a controlled movement across the image rather than bringing a large guillotine arm down over it.
Photo paper varies, though. Glossy, matte, coated, and heavier photographic stock can behave differently, so test an offcut before trimming an important finished print.
Cardstock also needs some attention. The thicker the material becomes, the fewer layers should be attempted in a single pass.
Do not treat every material like printer paper. Several sheets of ordinary copy paper can be much thinner than the same number of sheets of heavyweight craft cardstock.
If the rotary blade starts requiring excessive pressure or the material shifts during cutting, reduce the stack. A clean single cut is more useful than trying to force too many sheets through at once.
The same applies to laminated materials. Lamination adds thickness and changes the way the cutting edge interacts with the sheet, so use smaller batches and test first.
Why the Frifreego ranks fourth behind our heavy-duty cutters
The biggest advantage of this design is convenience. A commercial guillotine can be heavy enough that it deserves a permanent position on a dedicated workbench.
A rotary trimmer is much easier to integrate into a normal craft room. The compact format is easier to store, which matters if the dining table becomes the craft station on weekends and needs to return to normal afterward.
You can bring the cutter out for a project, trim the required pieces, then store it without dedicating a large section of the room to cutting equipment. That is a very different ownership experience from a heavy steel stack cutter.
The enclosed sliding mechanism can also feel more approachable for everyday craft work. The blade still needs to be treated carefully, but the cutting action is more contained than a large exposed guillotine edge.
Keep fingers away from the cutting path and follow the manufacturer's safety instructions. Never modify the blade carrier or defeat any protective component to cut material the trimmer was not designed to handle.
A contained blade still requires careful handling. Replace cutting components only according to the manufacturer's instructions and keep replacement blades away from children.
The work surface should remain clean as well. Small scraps can collect along the cutting track after repeated trimming, particularly when producing narrow borders or strips.
Remove scraps when the cutting head is safely positioned. Keeping the track clean helps the material sit flat and makes measurements easier to read.
The cutting track itself should also be inspected periodically. Rotary trimmers rely on the blade travelling consistently along the intended line, so worn cutting components can eventually affect edge quality.
Clean cuts depend on maintained cutting parts. If the paper begins tearing or requiring multiple passes when it previously cut cleanly, inspect the blade rather than simply pressing harder.
This is particularly important with photographs and printed artwork. A rough edge can be much more noticeable on a finished visual piece than on ordinary office paper.
The measurement guides become useful for planner projects too. Planner inserts often need identical widths and heights so they line up properly once punched and placed into the binder.
Print several pages, establish the correct dimensions, then trim each sheet using the same reference points. Consistent dimensions make planner pages look cleaner once the finished stack is assembled.
The same process works for handmade notebook inserts. You may not need to cut hundreds of pages simultaneously if the project is relatively small.
Instead, process manageable batches and check the finished dimensions periodically. This gives you more control over the result and reduces the amount of material lost if a measurement is wrong.
For vinyl-backed paper, labels, or specialty craft materials, check the manufacturer's supported material list before cutting. A paper trimmer should not automatically be assumed suitable for every thin sheet material simply because it physically fits underneath the blade.
Some materials can dull the cutting wheel more quickly or behave unpredictably. Use the cutter only with supported materials if you want predictable edge quality and reasonable blade life.
The rotary format also works nicely for trimming narrow strips. Decorative borders, paper bands, labels, and scrapbook accents often need long straight cuts with relatively small widths.
A measurement guide can help establish that width repeatedly. Once the first strip is correct, subsequent pieces can be aligned against the same reference.
Do not let the paper move while the blade travels. Hold the material using the intended pressure or guide system, keeping fingers outside the cutting path.
Paper movement creates inconsistent finished widths, especially on longer cuts where a small shift at the beginning can become more noticeable by the end.
The main reason the Frifreego ranks below our first three products is capacity. Our top-ranked INTBUYING is designed for substantial stack cutting, making it far more appropriate when large quantities of paper need to be processed together.
The second and third-ranked guillotine cutters also provide heavier construction and greater batch-oriented capability. They make more sense for high-volume bookbinding, commercial craft production, classroom preparation, and other jobs where stacks need to be reduced quickly.
The Frifreego cannot compete with that kind of mechanical cutting capacity. Rotary cutting prioritizes control over volume, which is why it lands in fourth rather than first.
But that ranking difference can reverse for a particular user. Someone making scrapbook pages and greeting cards at home may have no reason to own a 20-pound steel guillotine capable of cutting thick paper stacks.
A rotary cutter can be faster to set up, easier to store, and more comfortable for frequent single-sheet work. It is also well suited to projects where each printed piece needs individual visual alignment before trimming.
This makes the Frifreego a strong middle-ground option in our seven-product list. It has enough structure for serious crafting but remains much closer to the familiar desktop trimmer format.
It suits precision-focused home crafting particularly well, including card making, scrapbooking, photographs, planner inserts, paper decorations, labels, and smaller bookbinding projects.
The key is respecting its intended capacity. Do not force thick stacks simply because the cutter looks sturdy, and do not repeatedly run a worn blade through material that should cut cleanly in one pass.
Use scrap material to establish measurements, reduce the number of layers for heavier cardstock, keep the cutting track clean, and replace consumable cutting parts when edge quality starts declining.
That is why we believe the Frifreego Rotary Paper Trimmer deserves the number four ranking out of seven. It gives up the extreme batch capacity of our top three cutters, but gains easier storage, controlled rotary cutting, useful measurement guidance, and a format that fits naturally into a home craft workspace.
For somebody processing hundreds of pages at once, choose one of the heavy guillotines above it. For a crafter who mostly cuts cards, photographs, scrapbook paper, planner pages, and smaller batches, however, the Frifreego provides a practical balance of precision and convenience that may actually make more sense for everyday use.
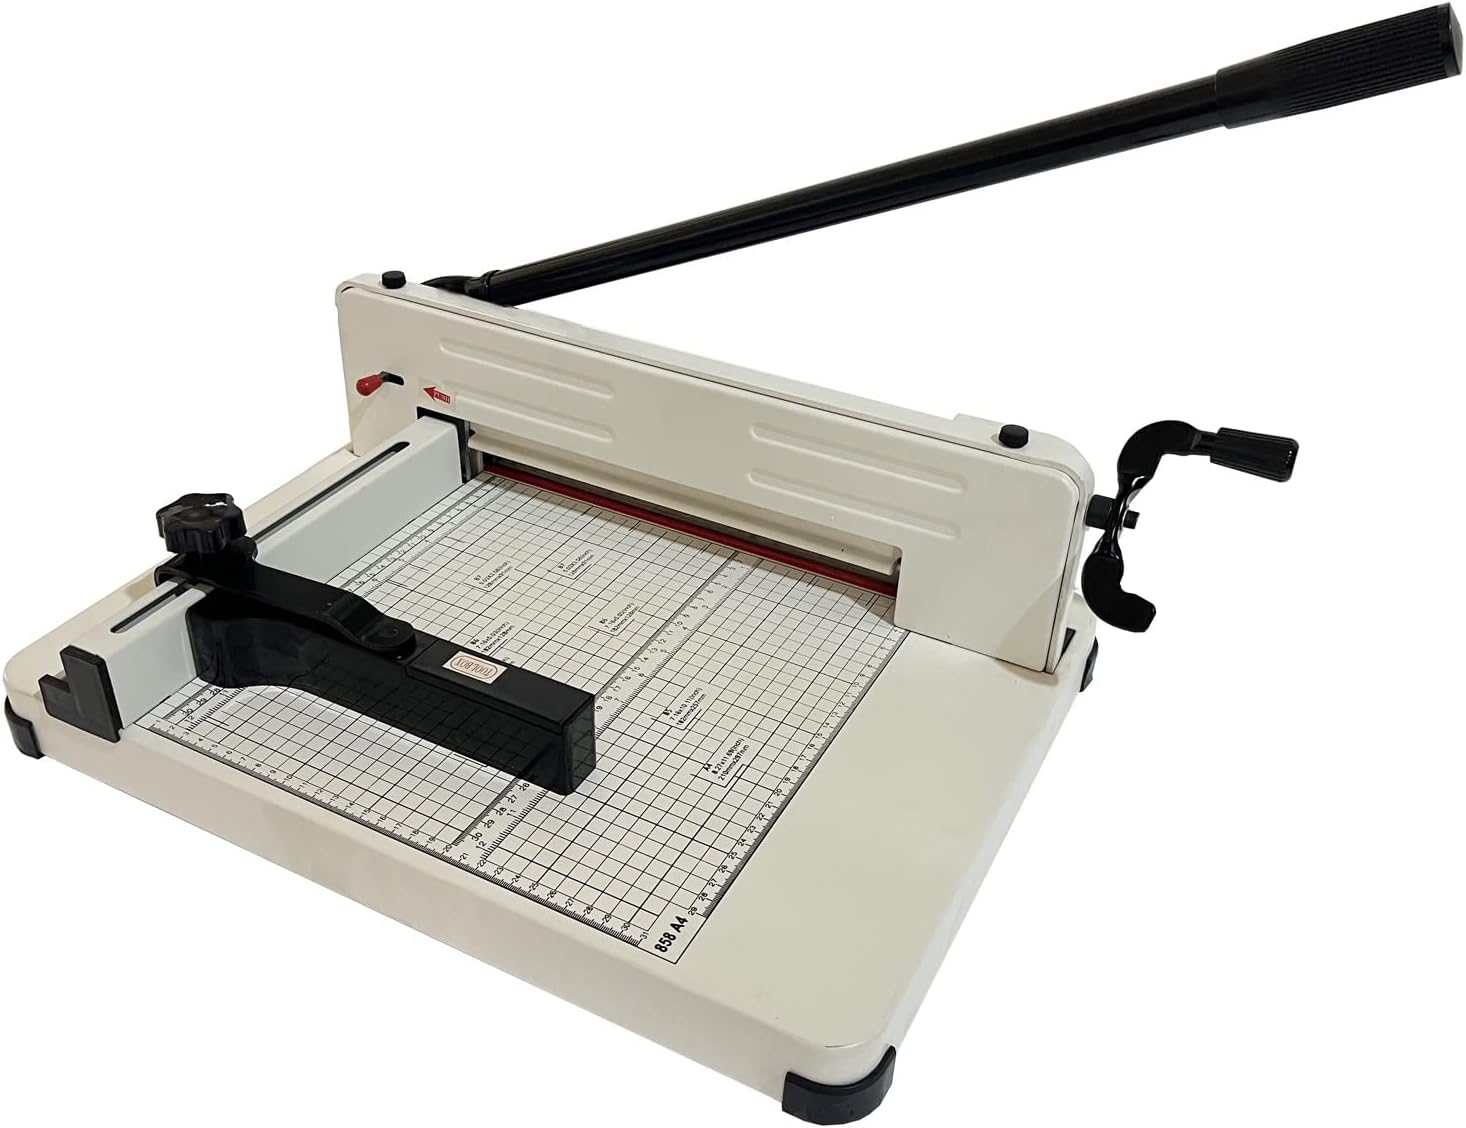
- Heavy-duty guillotine mechanism handles demanding paper trimming projects.
- High-capacity design allows multiple sheets to be cut together.
- Adjustable paper guide helps maintain consistent repeated cutting dimensions.
- Sturdy base provides better stability during manual cutting work.
- Long lever handle provides useful mechanical cutting assistance.
This makes more sense for batch crafting than occasional single-sheet trimming
The HayWHNKN Heavy-Duty Guillotine Paper Cutter takes the number five position in our best paper cutter for crafting comparison because it is designed around substantial straight cutting rather than lightweight portability. It uses a manual guillotine mechanism, a sturdy working base, and a long lever that provides additional mechanical advantage when trimming multiple sheets.
That makes it useful for crafters producing repeated pieces rather than somebody cutting one photograph every few weeks. Invitations, notebook pages, card blanks, planner inserts, printed worksheets, bookbinding pages, and similar projects can involve many identical cuts.
The biggest practical advantage is being able to work with a stack rather than repeating every cut one sheet at a time. Batch cutting can save considerable preparation time when several pieces need exactly the same finished dimensions.
There is a tradeoff, though. This is a more substantial machine than a compact rotary craft trimmer, so it needs a stable working area and more deliberate setup before every cut.
The guide and paper positioning matter just as much as the blade
A heavy guillotine can make a straight cut, but it cannot correct paper that was positioned incorrectly before the handle came down. Accuracy starts with measuring, aligning, and securing the material properly.
The adjustable paper guide is useful when producing repeated dimensions. A fixed guide improves repeat cutting consistency because every new sheet or stack can return to the same reference point.
Imagine producing fifty card inserts that all need to be the same width. Measuring each one independently with a ruler creates fifty opportunities for a small difference to appear.
Set the cutter correctly and the guide can provide a repeatable stop for each batch. That does not remove the need to check measurements, but it reduces the amount of repeated measuring during production.
Always make a test piece first. Measure the finished sample with a reliable ruler and compare it against the dimensions required by the project.
One test cut can prevent substantial waste, particularly when working with expensive cardstock, photographs, coated prints, or professionally printed invitations.
If the first piece is wrong by three millimeters, correct the guide before cutting anything else. A repeatable cutter will repeat an incorrect measurement just as consistently as a correct one.
The stack should also be squared before it goes into the cutter. Tap the edges against a flat surface so individual sheets are aligned rather than slightly staggered.
This matters with notebook and bookbinding projects. If the sheets begin misaligned, the finished stack can show an uneven outer edge even when the blade itself cuts perfectly straight.
Square paper stacks before every batch cut, then position them against the guide without allowing the lower sheets to shift.
Paper thickness needs to be considered separately from sheet count. A capacity figure based on normal office paper cannot automatically be applied to heavy craft card.
Ten sheets of thick cardstock can form a much larger stack than ten sheets of 70gsm or 80gsm copy paper. Coated sheets, photo paper, laminated material, and specialty craft stock can also behave differently under pressure.
Reduce the batch when the material gets thicker. Smaller stacks usually produce cleaner craft edges than forcing the cutter through more material than it can comfortably process.
If the handle suddenly requires much more force than expected, stop and inspect the setup. Do not assume additional pressure is always the answer.
The long lever is useful precisely because it multiplies the force applied by the user. That makes thicker batch cutting easier, but it also means the cutting mechanism needs to be treated carefully.
Keep fingers completely outside the blade path. Never hold a small craft component close to the cutting line simply because the lever makes the cut feel easy.
Mechanical leverage increases cutting force significantly, which is why a heavy-duty guillotine deserves more respect than a small enclosed sliding trimmer.
If a piece is too small to position and secure safely, use another tool. A rotary cutter, enclosed trimmer, craft knife with a suitable ruler, or another precision cutting system may be more appropriate.
Why the HayWHNKN finishes fifth in our seven-product comparison
The sturdy base is important because a guillotine needs to remain stable while the handle is moving. Place the cutter on a strong, level table rather than an unstable folding surface.
Check the working area before cutting. There should be enough room for the lever to move through its complete range without hitting a shelf, wall, lamp, or other craft equipment.
A clear workspace makes cutting more controlled. Loose scraps, rulers, scissors, and stacks waiting for the next operation should remain outside the blade and handle movement areas.
This is particularly important during repetitive work. After fifty cuts, small scraps can accumulate around the machine and make the workspace much less organized than it was at the beginning.
Clear the area periodically with the cutting mechanism in its safe position. Do not reach around the blade simply to remove a narrow strip of paper while the machine is ready for another cut.
The guillotine format works particularly well for card making. Large sheets of cardstock can be reduced into consistent card blanks before folding, scoring, or adding decorative layers.
Consistent card dimensions simplify later assembly, because printed panels, photographs, and decorative pieces can be prepared around one known finished size.
The cutter can also help with scrapbooking. Straight rectangular photo mats and layered paper elements look better when their borders remain consistent.
If one background rectangle is slightly crooked, the error becomes more noticeable once a photograph is centered on top of it. Accurate straight cuts reduce that problem before assembly begins.
Planner inserts are another useful example. Printed pages need consistent widths and heights so they align correctly after punching and insertion into the planner.
Process the pages in manageable batches rather than trying to maximize the stack every time. Consistency matters more than maximum sheet capacity when the finished pieces will be viewed together.
For handmade notebooks, the cutter can prepare interior sheets before binding. This is useful for coil binding, comb binding, stitching, or other methods where uneven page dimensions become visible along the finished edge.
Photographic materials can also be trimmed, but test them first. Glossy coatings and thicker photo stocks can react differently from normal paper.
A scrap from the same material can tell you whether the edge quality is acceptable. This takes very little time compared with replacing a finished print.
Test specialty materials before full production, especially when switching from standard paper to heavier or coated stock.
Blade condition also affects the finished edge. A properly maintained cutting edge should pass through supported material cleanly rather than leaving excessive tearing or crushing.
If edge quality gradually deteriorates, inspect and maintain the cutter according to the manufacturer's instructions. Applying more force to a worn blade is not a proper maintenance strategy.
This is particularly important with craft projects because the cut edge is often visible in the finished product. An office document can tolerate a slightly rough edge more easily than a wedding invitation or photo mount.
Clean cutting edges improve finished presentation, especially when several paper layers sit directly beside one another.
Storage is another consideration. A heavy-duty guillotine is less convenient to put away than a slim rotary trimmer.
If you use it regularly, a permanent or semi-permanent position on a craft bench makes more sense. Constantly lifting a substantial cutter from a cupboard can become inconvenient very quickly.
Secure the cutting mechanism whenever the machine is not being used. Keep it somewhere children cannot access it unsupervised.
Heavy-duty cutters require deliberate safe storage, because the blade remains a serious cutting component after the craft session has finished.
The main reason this HayWHNKN model lands at number five is the strength of the four products above it. Our number one INTBUYING provides a particularly substantial 17-inch A3 stack-cutting platform for high-volume work.
The second and third-ranked cutters also provide strong heavy-duty combinations for larger batch jobs. They stand out more clearly for demanding commercial-style paper preparation.
The fourth-ranked Frifreego takes a different approach. Its rotary mechanism sacrifices heavy stack capacity but offers a more compact and convenient format for everyday photographs, cards, scrapbook paper, and smaller craft projects.
The HayWHNKN sits between those two styles. It offers useful heavy-duty batch capability, but it is less compact than the rotary option and does not separate itself as strongly from the commercial-style guillotines ranked above it.
That does not make fifth place a poor result. For someone who specifically wants a manual guillotine for repeated straight cuts without moving into the largest stack-cutting equipment, this format can make a lot of sense.
It is particularly suitable when the work involves batches of card blanks, book pages, printed inserts, educational materials, and rectangular paper components. Those projects benefit directly from stable alignment and repeated straight cutting.
The key is using the machine according to the material rather than chasing the largest possible stack. A slightly smaller batch that stays square and cuts cleanly is better than a thick stack that moves halfway through the cut.
Precision should come before maximum capacity, particularly for crafting where the finished edge may remain visible.
So why do we believe the HayWHNKN Heavy-Duty Guillotine deserves the number five ranking out of seven? It combines substantial manual cutting power, batch capability, an adjustable guide, a stable base, and the mechanical leverage needed for repeated paper preparation.
It misses our higher positions because other models provide either stronger commercial-style capacity or greater everyday crafting convenience. Still, the HayWHNKN remains a useful middle-ground cutter for crafters who have outgrown lightweight trimmers but do not necessarily need the largest machine available.
Square the stack before cutting, test measurements on scrap paper, reduce the batch for thick cardstock, keep hands completely outside the cutting path, and maintain the blade according to the manufacturer's instructions. Used properly, this HayWHNKN provides reliable batch-cutting flexibility for card making, scrapbooking, bookbinding, printed crafts, and other straight-cut paper projects.

- Automatic clamp holds paper securely during the cutting process.
- Adjustable paper guide supports consistent repeated trimming dimensions.
- Printed gridlines simplify alignment for common crafting paper sizes.
- Guillotine cutting mechanism produces controlled straight paper cuts.
- Sturdy metal base provides stability during repeated craft projects.
The automatic clamp is the feature that makes this Dahle particularly easy to understand
The Dahle Vantage Guillotine takes the number six position in our best paper cutter for crafting comparison because it focuses on controlled, accurate paper trimming rather than extreme stack capacity. Its most useful feature is the automatic clamp, which helps hold material against the cutting surface while the guillotine blade moves through the paper.
That matters because paper movement is one of the easiest ways to ruin an otherwise accurate measurement. You can line up a sheet perfectly, but if it shifts several millimeters while the blade comes down, the finished edge will still be wrong.
The Dahle addresses this with a clamp that engages during cutting. Automatic clamping helps keep paper positioned, making the cutter useful for cards, photographs, scrapbook layers, printed artwork, planner pages, and other projects where straight edges matter.
It is a more traditional craft and office guillotine than the commercial stack cutters higher in our ranking. That means less brute cutting capacity, but it also creates a machine that is easier to use for everyday trimming jobs.
The gridlines and adjustable guide are what make repeated craft cuts easier
Paper crafting often involves making the same cut repeatedly. A card project might require twenty identical bases, twenty decorative front panels, and another twenty printed inserts.
Measuring every individual piece with a separate ruler is possible, but it creates more opportunities for small inconsistencies. The adjustable guide provides a repeatable reference once the correct finished dimension has been established.
Set the guide for the first piece, cut a sample, then measure the result. If the sample is correct, the same position can be used for the remaining pieces.
This is useful when producing invitations. If every printed insert needs to sit inside a folded card with the same border, even small dimensional differences can become obvious once the pieces are assembled.
The printed gridlines provide another visual reference. They help square the material on the cutting surface and make common measurements easier to establish without reaching for a separate ruler after every cut.
Gridlines help keep rectangular pieces square, which is particularly important with layered scrapbook pages and photo mats. A slightly crooked lower layer becomes much more obvious when another straight-edged piece is placed on top.
Do not rely blindly on the printed scale for an important production run, though. Use a ruler to verify the first finished piece before cutting an entire batch.
A measurement system can repeat a position very effectively, but that also means it will repeatedly reproduce an incorrect setup. One test cut prevents that problem.
Scrap paper is useful here. Set the cutter to the intended dimension, trim a spare sheet, measure it, and make any necessary adjustment before touching expensive cardstock or finished prints.
Test cuts reduce unnecessary material waste, especially when the project uses specialty paper, photographic stock, or professionally printed designs.
The automatic clamp becomes useful once that measurement is established. It reduces the need to press the paper down manually close to the cutting line.
That is convenient when working with several sheets, but capacity should still be respected. Do not assume that because the cutter handles multiple sheets of ordinary paper, it can handle the same number of sheets of heavy cardstock.
Paper thickness changes quickly between materials. Ten sheets of lightweight copy paper can be substantially thinner than ten sheets of premium card.
Reduce the batch for thicker craft stock. If the handle requires excessive force or the material begins shifting, use fewer sheets rather than forcing the blade through an oversized stack.
This is especially relevant with photo paper. Glossy and coated materials can be thicker and less forgiving than ordinary office paper.
Make a test cut using the same type of photo stock before trimming an important image. Check both the edge quality and whether the surface picks up any unwanted marks during clamping.
Planner inserts are another good use case. Printed pages need to remain consistent so the finished stack lines up properly after punching and insertion into a planner or binder.
Consistent page dimensions improve finished alignment, particularly when tabs, punched holes, and printed margins are expected to line up from page to page.
For handmade notebooks, the same principle applies. Interior sheets can be trimmed into manageable batches before binding rather than cutting each page individually.
The Dahle is not intended to compete with a massive commercial stack cutter for hundreds of pages at once. It is better suited to controlled craft batches where precision and convenient setup matter more than maximum volume.
Why the Dahle finishes sixth even though its everyday design is practical
The guillotine mechanism makes straight cuts quickly. Position the paper, verify the guide, keep hands outside the cutting path, and operate the handle using a controlled movement.
Safety still deserves attention. A guillotine blade is serious cutting equipment, even when the cutter is designed for office or craft use rather than industrial production.
Keep fingers completely away from the blade path. Use the clamp and guide rather than trying to hold a narrow piece beside the blade with your hand.
If a piece is too small to secure properly, use another cutting method. A rotary cutter or precision craft knife may be more suitable for tiny decorative components.
The cutter should sit on a stable, level surface. A machine that moves during operation makes accurate alignment more difficult and can create an unnecessary safety issue.
A stable workbench improves cutting control. Check that all of the cutter's feet are contacting the surface properly before starting a long batch.
Leave enough clearance around the handle too. The complete lever movement should remain free from shelves, walls, lamps, containers, and other craft equipment.
This matters in a crowded craft room where storage often expands around the cutting station. Do not sacrifice handle clearance just to fit another organizer behind the cutter.
Paper scraps also accumulate quickly. Narrow strips can collect beside the blade after trimming borders or reducing several sheets to size.
Clear scraps only when the cutting mechanism is in a safe position. Keep the blade area clear between batches rather than allowing small offcuts to interfere with the next sheet.
Blade condition affects cutting quality as the machine ages. A properly functioning edge should cut supported material cleanly without excessive tearing or fuzzy paper fibers.
If the edge quality starts deteriorating, inspect the cutter according to Dahle's maintenance instructions. Increasing force is not the correct response to a blade that needs attention.
This matters more in crafting than routine office trimming. A slightly rough edge on an internal memo may be irrelevant, but the same edge on a wedding invitation can be visible immediately.
Clean edges improve professional-looking craft results, particularly when paper pieces are stacked, layered, folded, or displayed side by side.
The adjustable guide is especially useful for producing narrow borders. Once a width is established, several strips can be cut to the same dimension without individually marking every sheet.
This can be useful for scrapbook accents, decorative paper bands, labels, card elements, and other rectangular pieces. Always keep the material large enough to be held safely by the cutter's intended system.
The Dahle's relatively conventional design is also useful in classrooms and shared craft rooms. The automatic clamp and measurement grid make the workflow fairly easy to understand after the user has learned the safety procedure.
The cutter favors controlled everyday trimming rather than extremely high-volume production. That distinction explains much of its position in this ranking.
Our number one INTBUYING is a much heavier 17-inch A3 stack cutter designed for substantial batch processing. It is better suited to users who regularly need to cut thick stacks of pages together.
The second and third-ranked products also provide stronger commercial-style cutting capability. Those machines make more sense when production volume is one of the main buying criteria.
The fourth-ranked Frifreego goes in the opposite direction. Its rotary mechanism is more compact and convenient for individual photographs, cards, and everyday craft pieces.
The HayWHNKN in fifth provides a stronger heavy-duty guillotine proposition for batch-oriented work. Against those options, the Dahle lands in a somewhat narrower middle position.
Its strength is precision rather than huge capacity. The automatic clamp, guide, gridlines, and conventional guillotine format are useful, but they do not give it the same high-volume advantage as our top models.
That does not mean sixth place makes it a weak choice. In fact, somebody who does not need to process very thick stacks may prefer the Dahle because the setup is more appropriate for ordinary craft trimming.
A high-capacity commercial cutter can be unnecessary if the typical project involves five cards, several photographs, or a few scrapbook pages. Bigger is not automatically better when storage and setup time are considered.
The Dahle can remain on a normal craft table without turning the workspace into a small print shop. Its grid and adjustable guide also make it useful for frequent measurement-based work.
Repeated craft dimensions are easier to manage when the cutter itself provides clear alignment references. That can save time even when only one or two sheets are being cut at once.
Storage still requires care because the blade should be secured whenever the cutter is not in use. Follow Dahle's instructions for locking or storing the cutting mechanism and keep it away from unsupervised children.
Do not place heavy items on top of the cutter during storage. The cutting bed and guide should remain clear and ready for proper alignment the next time the machine is used.
So why do we believe the Dahle Vantage Guillotine deserves the number six ranking out of seven? It offers useful automatic clamping, measurement gridlines, an adjustable guide, stable construction, and the fast straight-cutting action expected from a quality guillotine.
It finishes behind the higher-ranked models because its strength is controlled everyday trimming rather than extreme stack capacity or the compact convenience of a rotary cutter. For the right crafter, though, that can be exactly the better balance.
Make a test cut before processing expensive material, reduce the number of sheets for heavy cardstock, use the guide for repeated dimensions, and keep hands completely outside the blade path. For card making, scrapbooking, photographs, planner pages, and general paper crafts, the Dahle remains a precise and practical choice despite its number six position.

- EdgeGlow illuminated cutting guide improves visibility along cut lines.
- Guillotine blade provides quick straight cuts for crafting projects.
- Measurement grid helps align paper for consistent repeated trimming.
- Lightweight desktop design is easier to move and store.
- Protective guard adds separation between fingers and cutting blade.
The EdgeGlow guide is genuinely useful when the cut line is difficult to see
The Swingline ClassicCut EdgeGlow G7010012 takes the number seven position in our best paper cutter for crafting comparison, but it has one feature that immediately separates it from conventional guillotines. The EdgeGlow system illuminates the cutting edge, making it easier to see where the blade will meet the paper before committing to the cut.
That can be particularly useful with printed craft projects. When trimming photographs, invitations, artwork, card fronts, or scrapbook elements, the difference between cutting on a border and cutting slightly inside it can be only a few millimeters.
The illuminated edge gives you another visual reference before bringing the guillotine handle down. The glowing cut line improves visibility, especially when working with detailed prints where the edge of the paper and the intended trim line are close together.
This is not a commercial stack cutter like several products higher in our ranking. It is much closer to a conventional desktop guillotine, which means it favors manageable craft jobs, easier storage, and quick setup over extreme cutting capacity.
This works better for careful craft trimming than thick production stacks
A lightweight guillotine can be very practical when the project involves a few sheets at a time. There is less setup than with a large industrial cutter, and the machine does not need to occupy a permanent section of a heavy workbench.
That makes the ClassicCut EdgeGlow useful for greeting cards. Straight controlled cuts improve card assembly, particularly when a decorative front panel needs to fit inside the card with a consistent border around all four sides.
For example, you might print six card designs on separate sheets and need to remove excess white border from each one. The EdgeGlow guide helps show the cutting position while the measurement grid provides a reference for the finished dimensions.
Cut the first piece and measure it before processing the remaining sheets. If the dimensions are correct, use the same guide position for subsequent pieces.
This is important because a cutting guide can only repeat the position you establish. If the original measurement is wrong, every repeated cut will carry the same error.
Test one piece before cutting the batch, especially when the material is expensive or cannot easily be reprinted.
Photographs are another good example. A visible cutting guide can help when removing narrow margins from a printed photo where the intended border needs to remain consistent.
Photo paper should still be tested before important work. Glossy and coated papers can be thicker than ordinary copy paper, and the surface can behave differently during cutting.
The same applies to cardstock. Sheet capacity should never be interpreted without considering the thickness of the material being cut.
Heavy cardstock requires smaller cutting batches than lightweight office paper. If the handle requires excessive force or the stack starts shifting, reduce the number of sheets.
Trying to maximize sheet capacity is not always useful in crafting anyway. If the project involves printed designs that need individual visual alignment, cutting a smaller batch gives you more control over each finished piece.
Scrapbooking is a good example of this. Decorative layers often need slightly different dimensions, so cutting fifty sheets simultaneously would provide no real advantage.
Instead, use the grid to establish each required measurement. Cut the background layer, verify it, then set the next dimension for the smaller piece that will sit on top.
Accurate layers create cleaner scrapbook borders, because small alignment errors become much more obvious when rectangular pieces are stacked together.
Planner pages can also benefit from the measurement grid. Printed inserts need consistent dimensions if they are going to align neatly after punching and placement inside a planner.
Trim the pages in manageable batches and check the finished stack periodically. This catches alignment problems before an entire project has been processed.
Why the ClassicCut EdgeGlow finishes seventh despite its clever cutting guide
The biggest limitation compared with our top choices is cutting capacity. The INTBUYING in first place is designed around serious A3 stack cutting, which makes it far more appropriate for high-volume bookbinding and repeated production.
The second and third-ranked heavy-duty cutters also provide stronger mechanical construction for batch work. Commercial cutters handle larger workloads more efficiently when dozens or hundreds of pages need identical straight cuts.
The Swingline is a lighter-duty tool. That makes it easier to move around a craft room, but it also means it is not intended to replace a high-capacity stack guillotine.
Our fourth-ranked Frifreego takes another approach with its rotary cutting mechanism. That design offers controlled sliding cuts and convenient storage for home crafting.
The HayWHNKN and Dahle products also provide useful guillotine features, including stronger batch-oriented designs or automatic clamping. Those advantages push the Swingline to the final position in this particular seven-product comparison.
But there is an important counterpoint. Lower capacity can mean easier everyday handling, and not every crafter needs an industrial machine sitting permanently on a table.
If your typical project involves ten cards, a few photographs, several scrapbook pages, or a small set of planner inserts, enormous stack capacity may provide little benefit.
The Swingline can be brought out when needed and stored more easily afterward. That matters in homes where the craft table also serves another purpose.
The EdgeGlow feature becomes particularly valuable in that type of occasional precision work. Instead of buying the cutter because it can process the largest possible stack, you are choosing it because the cutting position is easy to see.
Cut-line visibility helps with detailed trimming, especially when printed artwork extends close to the intended edge.
The measurement grid should still be used alongside the illuminated guide. One helps establish the dimensions while the other helps visualize the blade location.
Square the paper against the appropriate reference edge before cutting. If the sheet begins crooked, a perfectly visible cutting line can still produce a crooked finished piece.
Hold or secure the material only using the areas and methods intended by Swingline. Keep fingers completely outside the blade path.
The protective guard should always remain in place. Do not remove or modify a safety component simply to make an unusual craft cut easier.
Small pieces deserve particular caution. If a paper component is too narrow to position safely without placing fingers near the cutting area, switch to a more appropriate precision tool.
A craft knife used with a suitable cutting mat and straightedge, or an enclosed rotary trimmer, may be better for tiny components. The guillotine is primarily designed for straight cuts on material large enough to position safely.
Keep the work surface stable during operation. Even a lighter desktop cutter should sit on a level table rather than moving every time the handle is lowered.
Stable positioning improves cutting accuracy because the paper and cutter remain in the same relationship throughout the blade movement.
Clear scraps regularly as well. Narrow paper strips can collect around the cutting edge after trimming several borders.
Only remove scraps with the blade and handle in the safe position specified by the manufacturer. Do not reach underneath or around the cutting mechanism while it is ready to operate.
Blade condition affects finished quality over time. If supported paper starts tearing rather than cutting cleanly, inspect the blade and cutting system according to Swingline's maintenance instructions.
A clean blade produces better visible edges, which matters on photographs, invitations, cards, and scrapbook elements where the cut remains part of the finished presentation.
Do not compensate for a worn cutting edge by forcing the handle harder. Maintenance is preferable to increasing pressure on a blade that no longer performs correctly.
Storage deserves some thought too. Secure the cutting arm using the intended locking mechanism whenever the cutter is not being used.
Keep the product somewhere unsupervised children cannot access it. A familiar office-style guillotine still contains a sharp cutting edge and should be treated accordingly.
The EdgeGlow system may require its own power source depending on the exact version and configuration. Check the product instructions so the illumination is ready when you need it rather than discovering during a project that the guide is unavailable.
The illuminated edge is the standout feature, so maintaining that functionality is worthwhile if precise visual alignment is one of the main reasons for choosing this model.
The Swingline also makes sense for classrooms and shared creative spaces where the cutter needs to be moved between work areas. Its lighter-duty construction is more manageable than the commercial machines at the top of our list.
That portability comes with the obvious compromise in batch capacity. It is better to make several controlled cuts than overload the cutter trying to imitate a machine designed for much thicker stacks.
This is why we believe the Swingline ClassicCut EdgeGlow G7010012 deserves the number seven ranking out of seven. Its illuminated cutting guide, measurement grid, protective features, straightforward guillotine action, and easier desktop format make it useful, but the models above it provide stronger combinations of capacity, clamping, heavy-duty construction, or rotary convenience.
For high-volume crafting, bookbinding, or repeated stack cutting, one of our higher-ranked heavy-duty machines makes more sense. But for card making, photographs, scrapbook layouts, planner inserts, and smaller paper projects where seeing the intended cut clearly matters, the Swingline still has a useful role.
Test the measurement on scrap material, reduce the batch for thicker cardstock, keep the paper square against the guide, and always keep hands outside the blade path. Used within its intended capacity, the ClassicCut EdgeGlow provides convenient precision-focused trimming in a format that is much easier to accommodate than an industrial paper cutter.